CI/CD
This section walks you through an example CI/CD pipeline that uses GitHub Actions, Arista AVD (Architect, Validate, and Deploy) framework, and Arista CloudVision (CV). Please note, this guide assumes you have already completed the AVD L2LS or L3LS workshop. If you still need to complete the workshop, instructions are provided in this guide.
Prerequisites
Readers should be familiar with the following concepts.
Lab Topology
Throughout this section, we will use the following dual data center topology. Click on the image to zoom in for details.

Step 1 - Fork and Clone the Repository
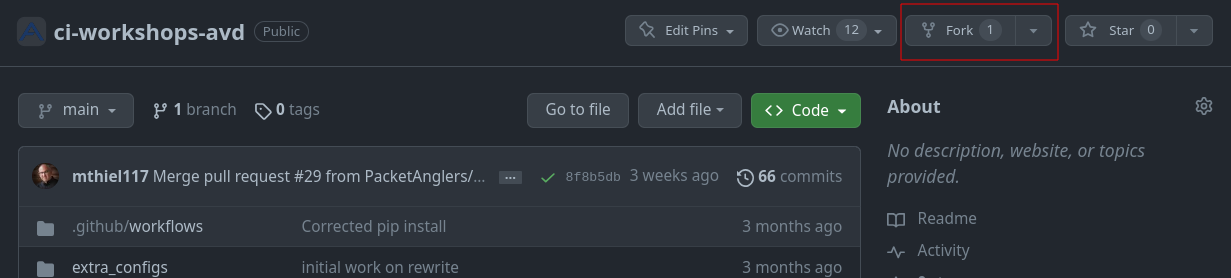
We will start by forking our workshop repository. A fork is a copy of a repository that you can modify as you please. To get started, log in to your GitHub account and fork the ci-workshops-avd repository.
Warning
You can skip this steps if you are continuing from the AVD workshop.
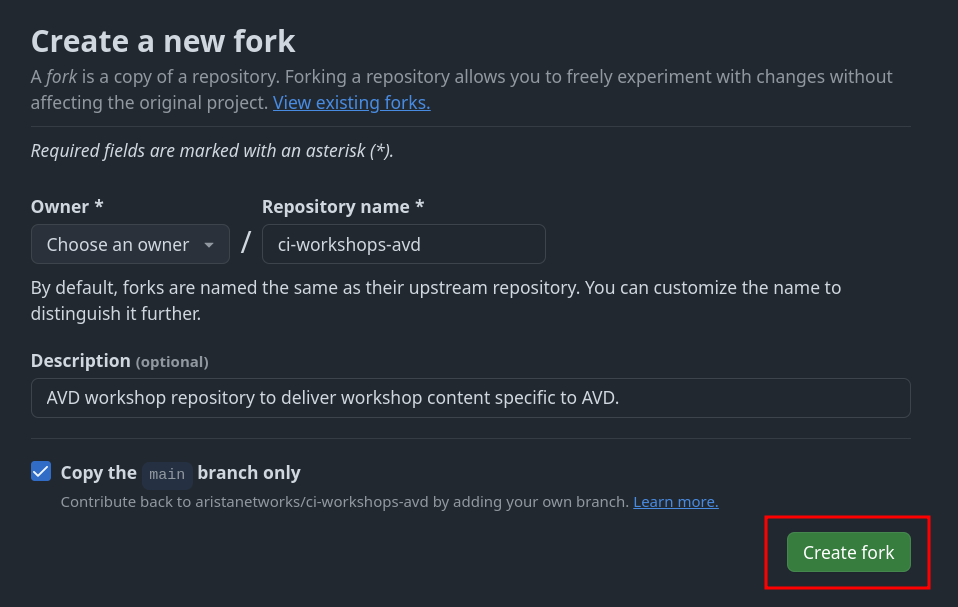
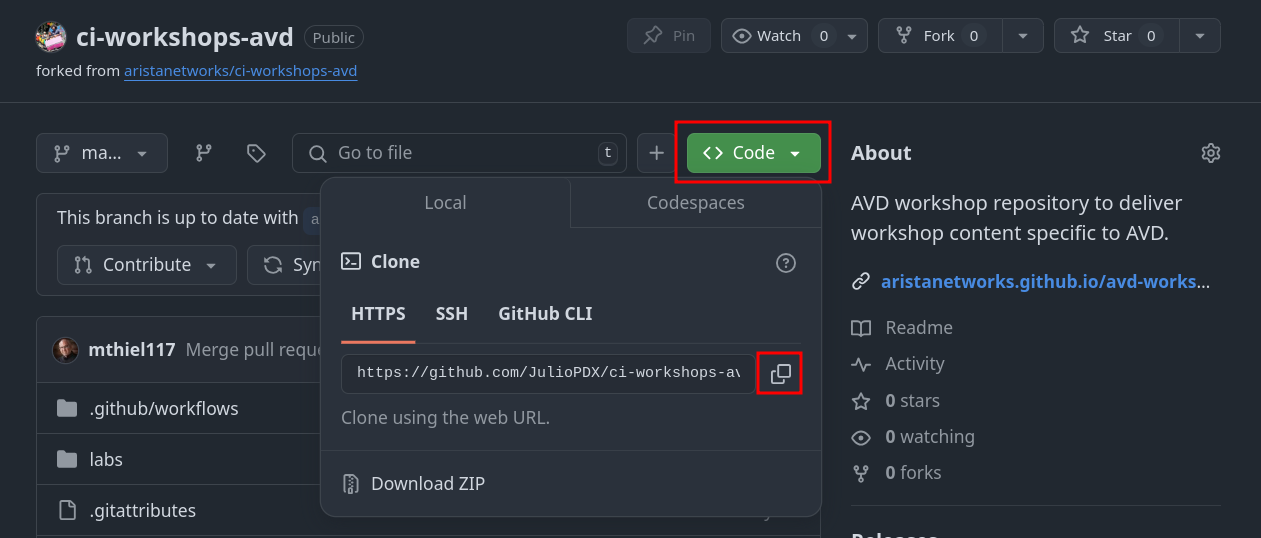
Make sure to hit the copy radio button before moving on to the next step.
-
On the IDE terminal, run the following commands:
-
Configure your global Git settings.
Step 2 - Install Python and Ansible Requirements
You can check the current AVD version by running the following command:
Note
Pre-installed collection versions vary depending on the ATD lab version.
➜  ci-workshops-avd git:(main) ansible-galaxy collection list

# /home/coder/.ansible/collections/ansible_collections
Collection        Version
----------------- -------
ansible.netcommon 7.1.0
ansible.posix     1.5.4
ansible.utils     5.1.2
arista.avd        5.2.2
arista.cvp        3.12.0
arista.eos        10.1.1
community.general 6.5.0
➜  ci-workshops-avd git:(main)
Run the following commands to install the required packages within the ATD environment.
Step 3 - Apply Base Lab Configuration
Next, we need to apply the base configurations for the L2LS fabric and the IP network. This will update your group variables and configure the hosts and core nodes, bringing the lab to the correct starting state for the CI/CD workflow.
First, move to the correct directory in your terminal:
Now, run the following make commands. These will update your group variables, deploy the fabric configurations, and configure the out-of-scope IP network nodes.
Your lab environment is now fully configured and in the correct state to begin the CI/CD portion.
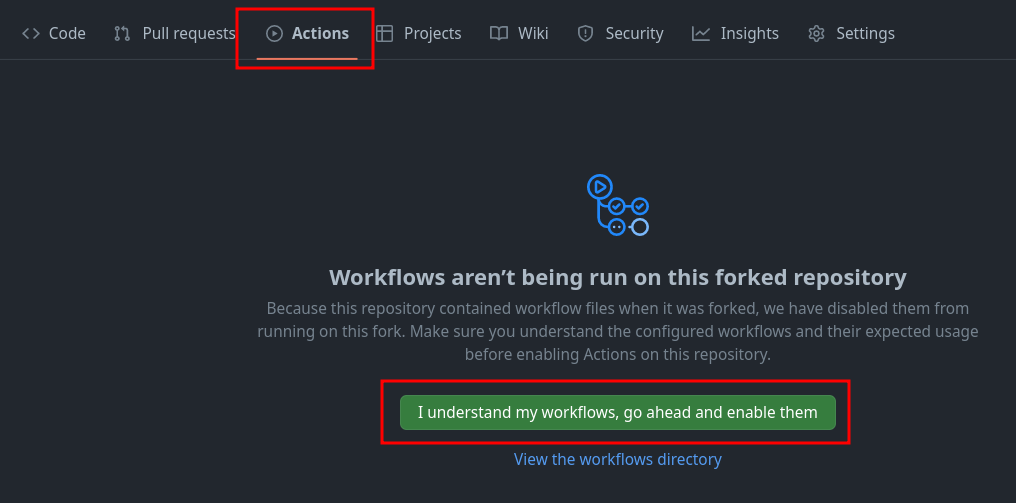
Step 4 - Enable GitHub Actions
- Go to Actions
- Click
I understand my workflows, go ahead and enable them
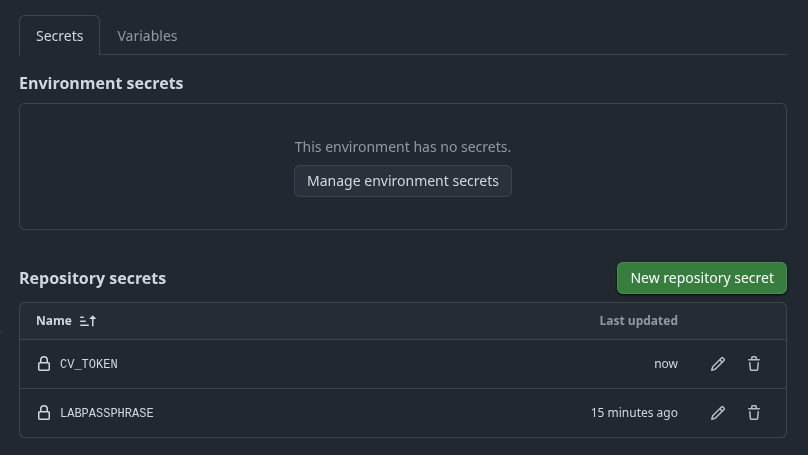
Set GitHub Secret - Nodes
You will need to set two credentials in your newly forked GitHub repository. One to reference the node credentials and another to authenticate with CloudVision.
- Go to
Settings - Click
Secrets and variables - Click
Actions - Click
New repository secret
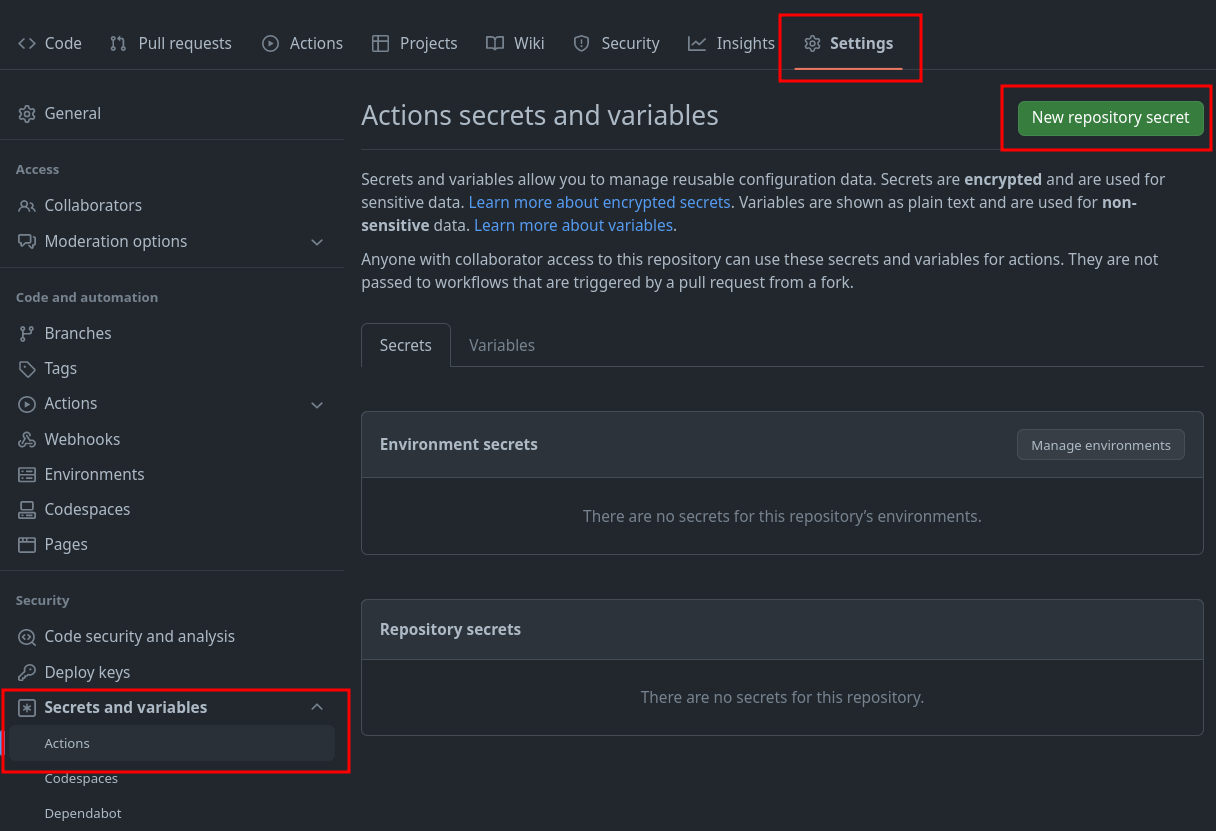
-
Enter the secret as follows
-
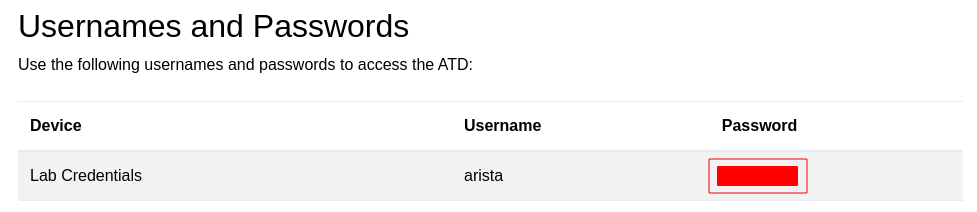
Name:
LABPASSPHRASE -
Secret: Listed in ATD lab topology
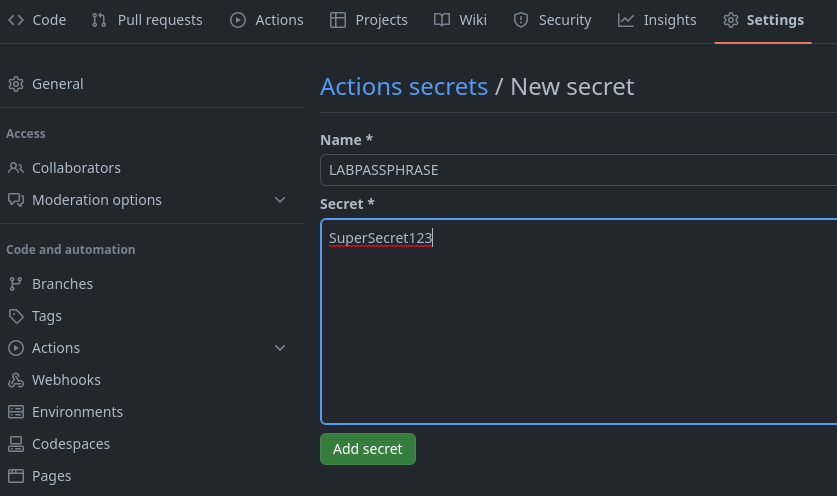
-
Click
Add secret
Set GitHub Secret - CloudVision Service Account
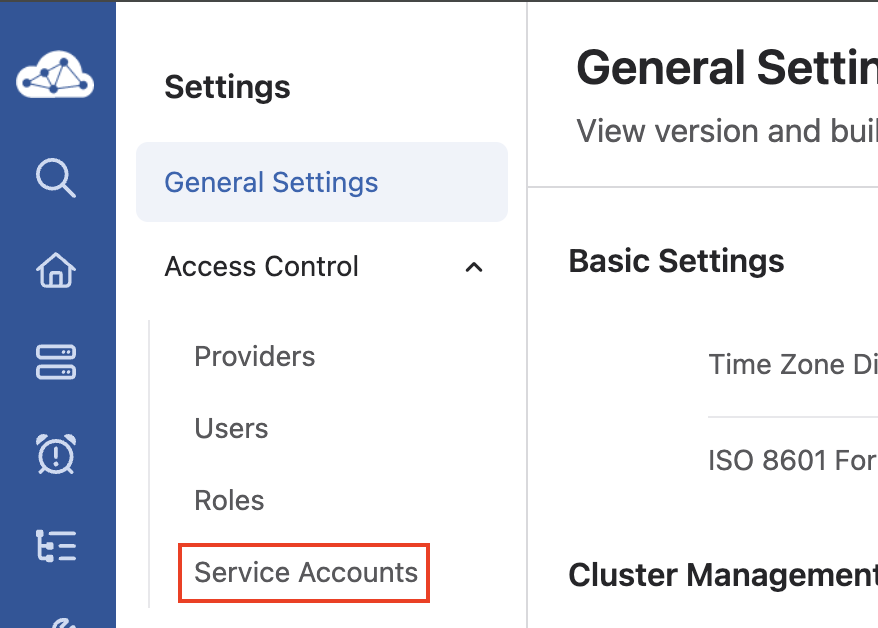
First, we will create our CloudVision Service Account and its associated token so we can talk to CloudVision with AVD, so we will want to launch our CloudVision instance from the ATD main dashboard.
CloudVision Service Account Documentation
The official instructions here CloudVison documentation website. The token is used to connect to the CloudVision APIs when using the arista.avd.cv_deploy role.
-
To access the
Service Accountcreation area, first click Settings (gear icon), in the bottom left corner of CloudVision.
-
Next, click Service Accounts listed underneath the Access Control item,
-
Once in the Service Accounts menu area, click the New Service Account button.
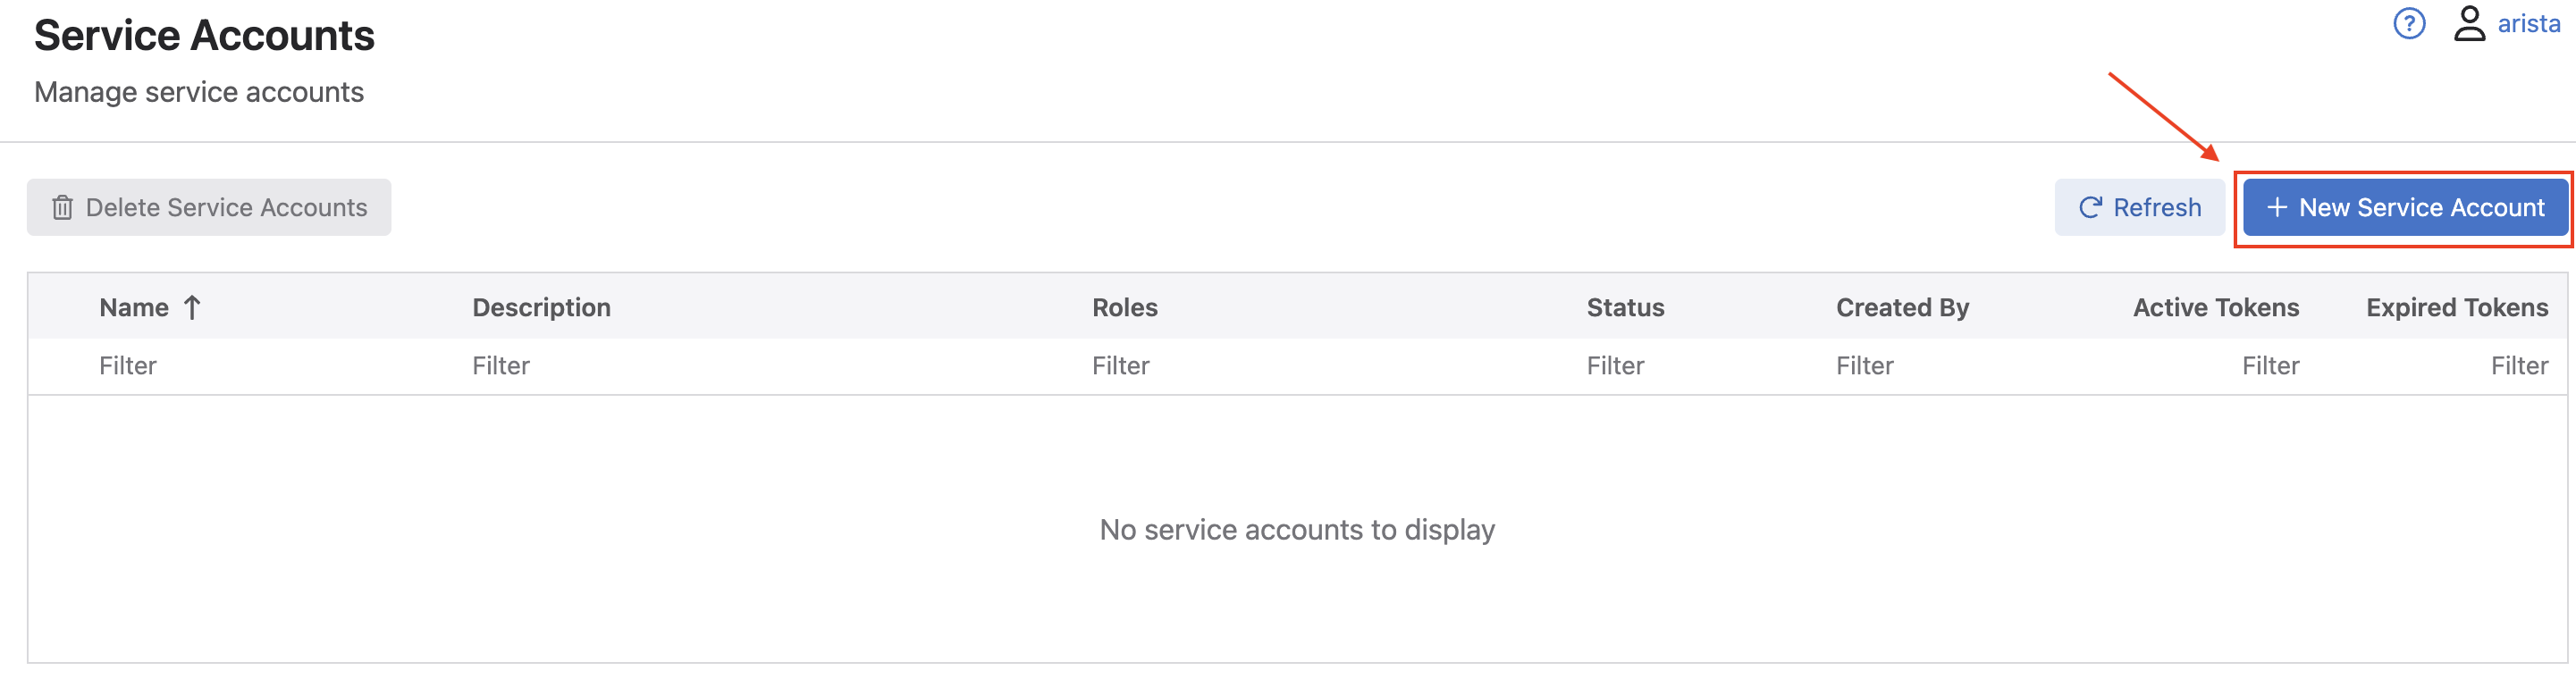
-
In the New Service Account window that pops up, fill in a
service account name,description(these can be any name or description you choose), select the drop down list for Roles, and selectnetwork-admin, and click Create.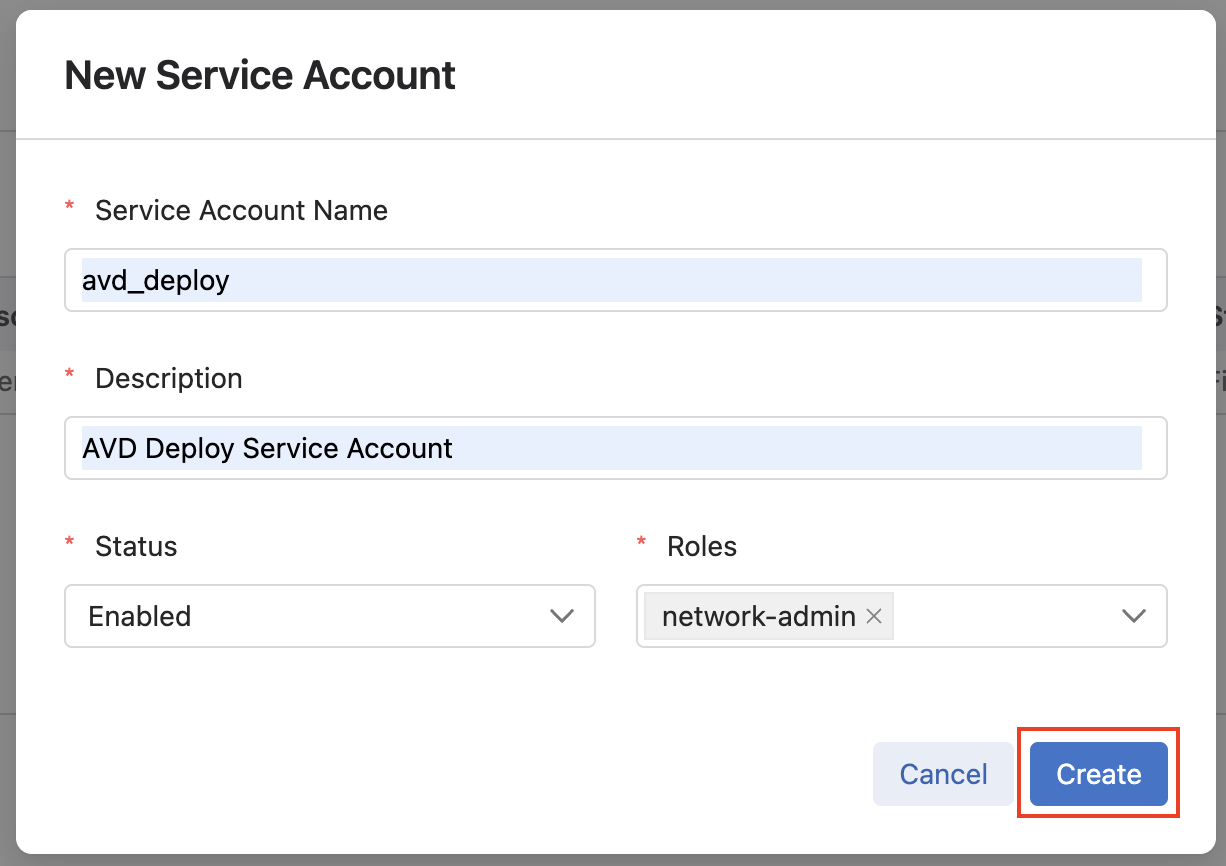
-
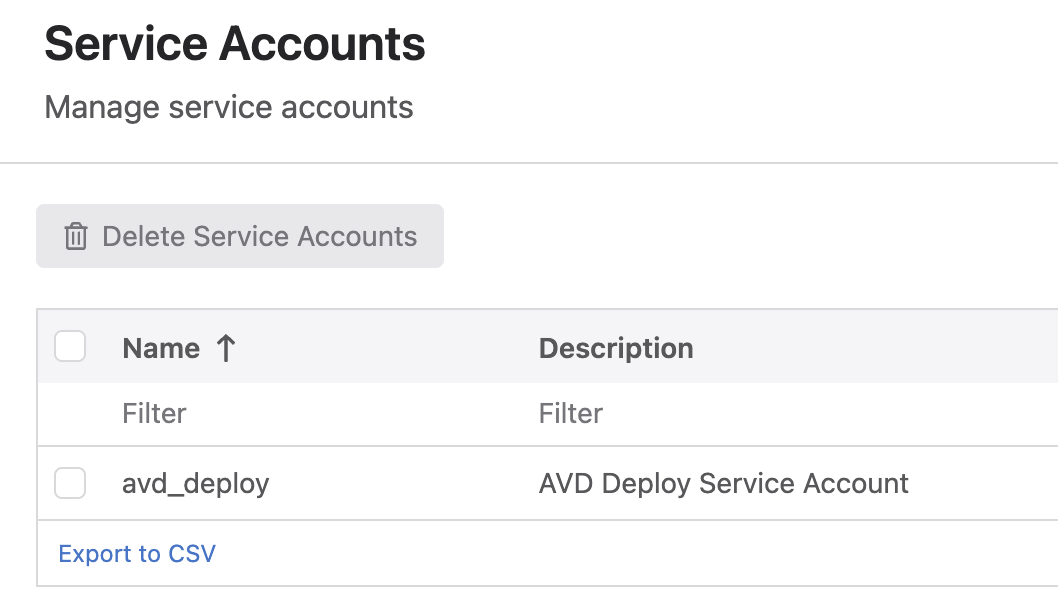
You should then be taken back to the main Service Accounts list, where you should see an account listed with the name and description you gave it in the previous step.
-
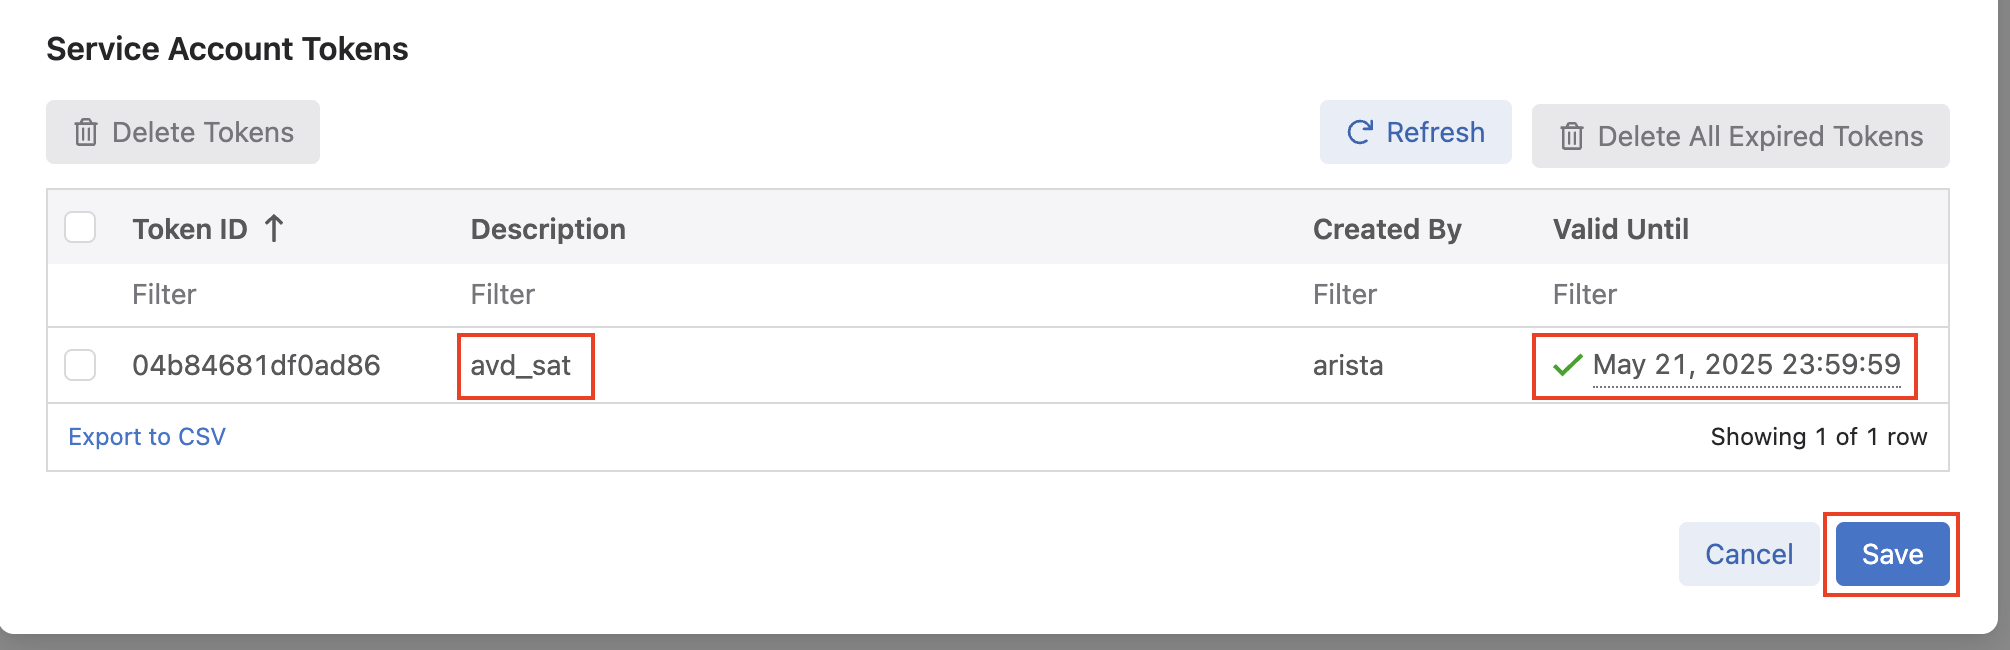
Next, click the name of your service account, which should open the Edit Service Account window. Under the Generate Service Account Token area, add a
Description, and select the calendar icon to pick aValid Untildate, and finally click Generate.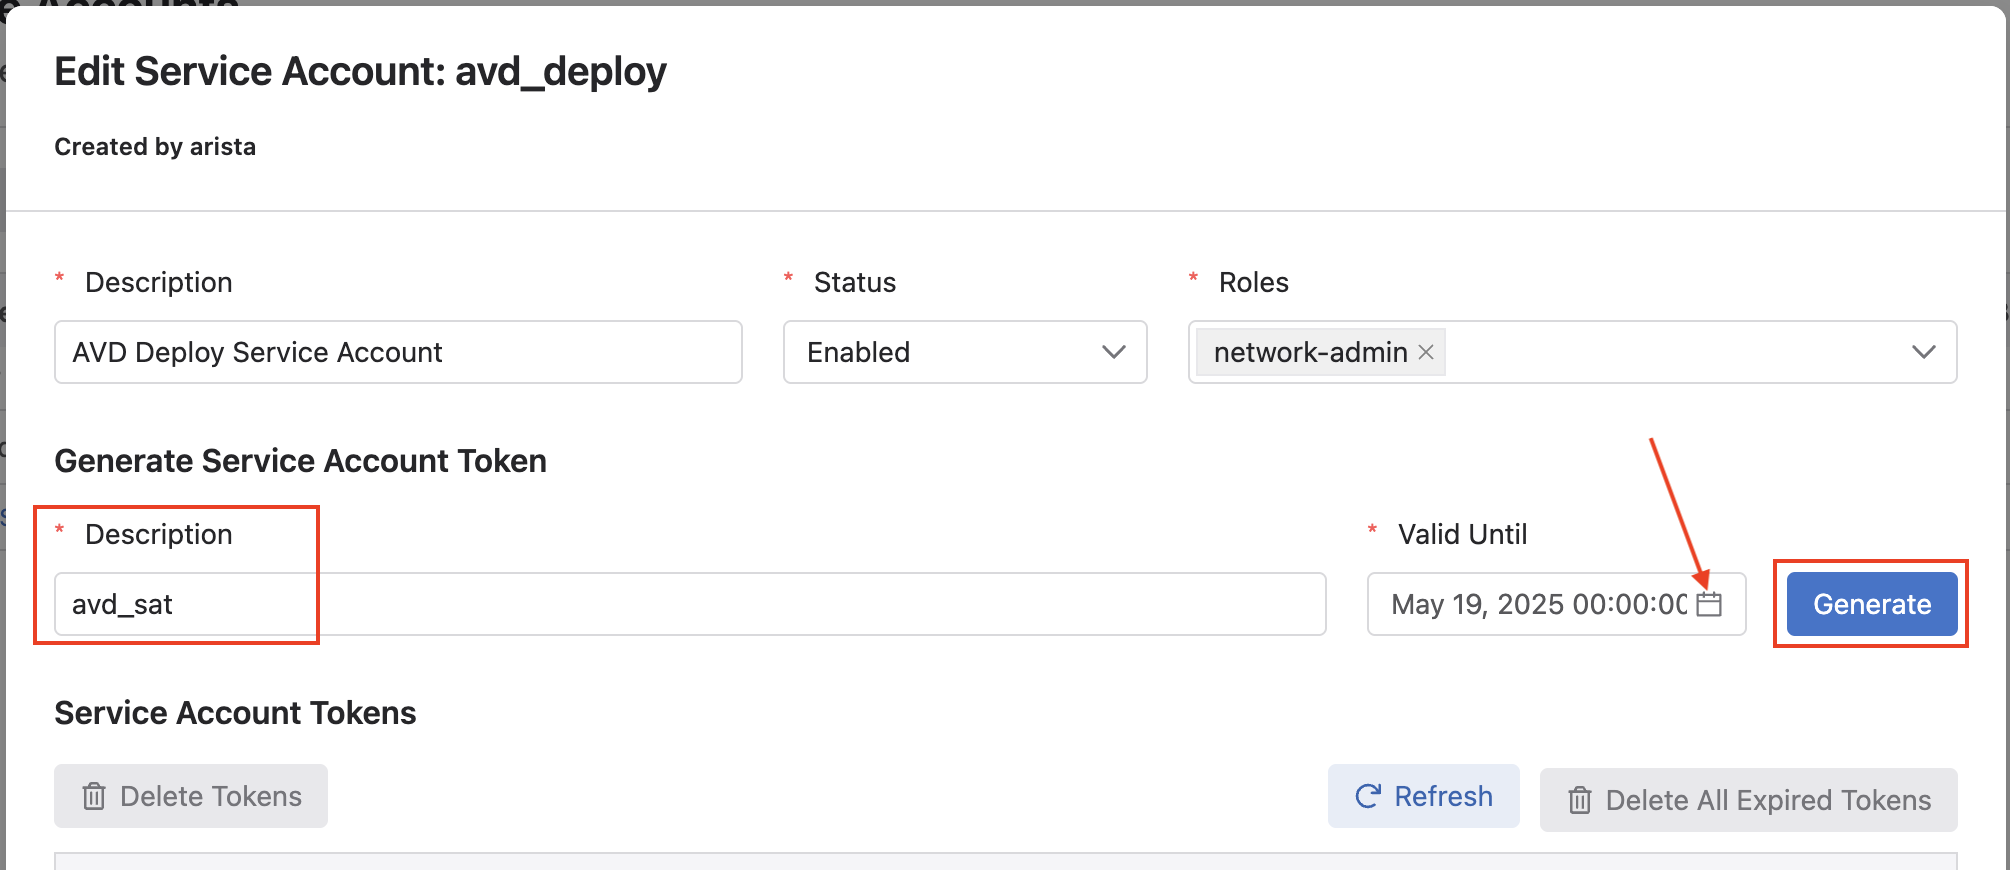
-
After clicking Generate, a new window will open with your service account token. Make sure you click the copy radio button as we will be saving this token in our GitHub Actions Secrets, same as the previous step.
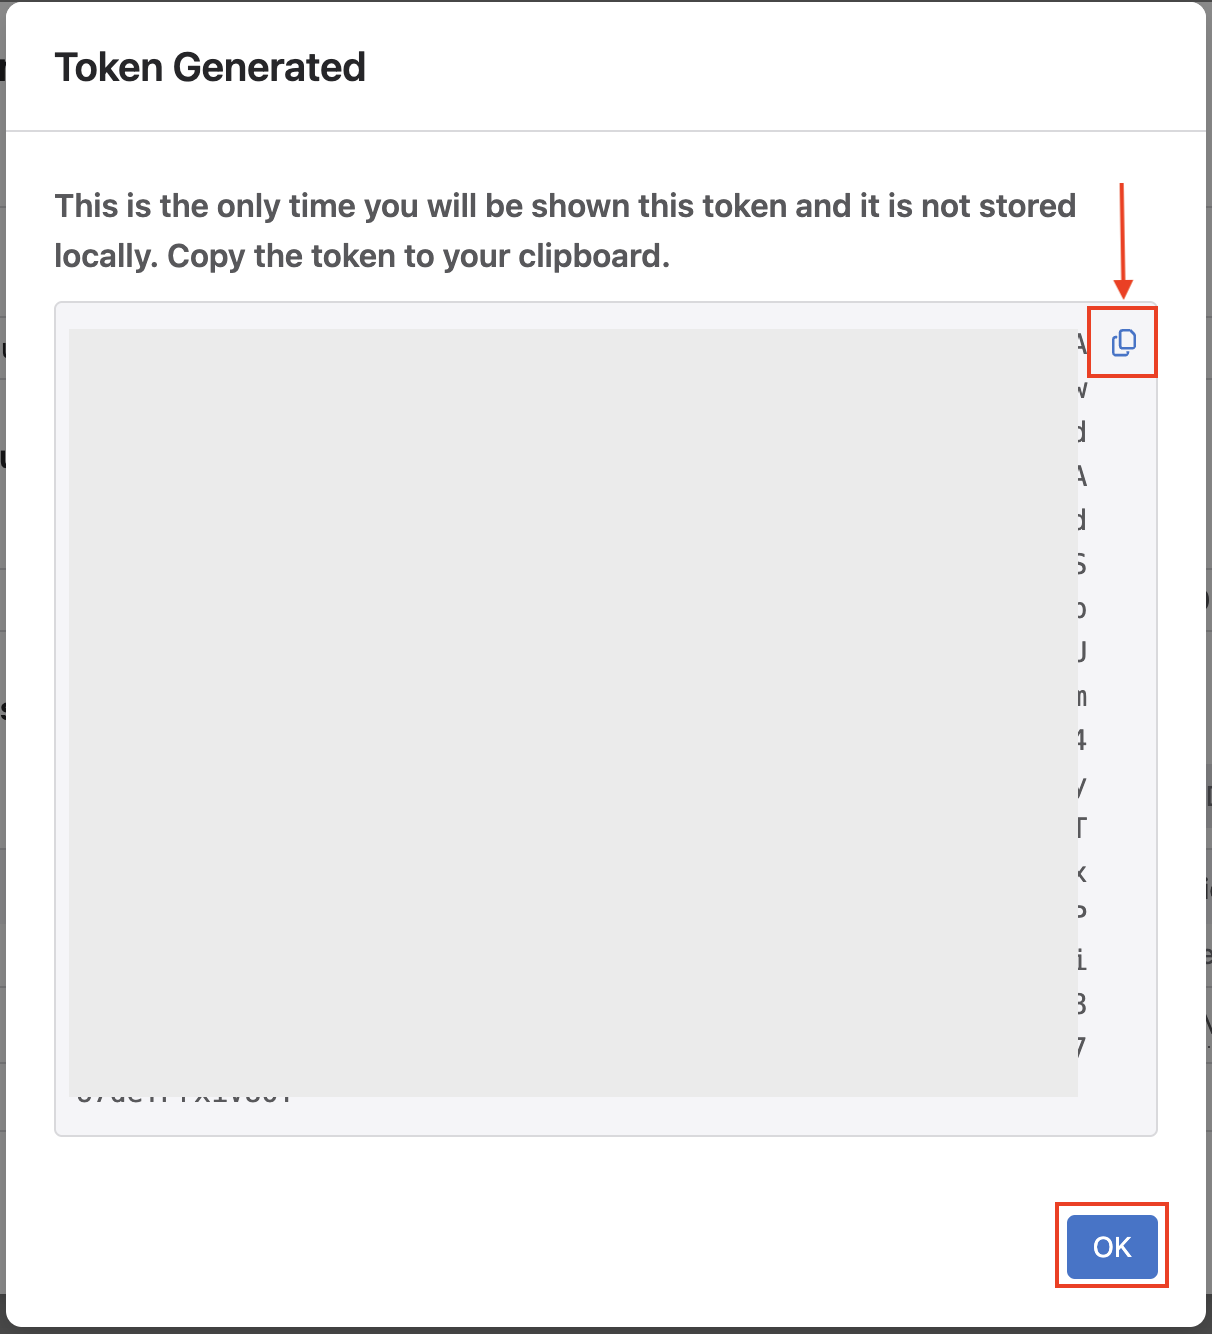
- Name:
CV_TOKEN - Secret: From your clipboard on token creation
Note
We set the token as an environment variable for basic security. In a production environment, we recommend leveraging Ansible Vault.
After saving the new secret, go back to CloudVision and click OK on the token screen.
- Name:
-
Finally, after clicking Ok, you will be back at the Edit Service Account window, where you should see a token listed matching the description and validity date you set. Click Save to save the token.
Step 5 - Sync With Remote Repository
-
From the IDE terminal, run the following:
Step 6 - Create a New Branch
In a moment, we will be deploying changes to our environment. In reality, updates to a code repository would be done from a development or feature branch. We will follow this same workflow.
Note
This example will use the branch name dc-updates. If you use a different branch name, update the upcoming examples appropriately.
Step 7 - GitHub Actions
GitHub Actions is a CI/CD platform within GitHub. We can leverage GitHub Actions to create automated workflows within our repository. These workflows can be as simple as notifying appropriate reviewers of a change and automating the entire release of an application or network infrastructure.
Workflow Files
GitHub actions are defined by separate files (dev.yml and prod.yml) within our code repository's .github/workflows directory.
At the highest level of our workflow file, we set the name of the workflow. This version of our workflow file represents any pushes that do not go to the main branch. For example, we would like our test or development workflow to start whenever we push or change any branches not named main. We can control this by setting the on.push.branches-ignore variable to main.
In the next portion of the workflow file, we define a dictionary of jobs. For this example, we will only use one job with multiple steps. We set the ATD credentials we created as an environment variable that will be available for our future steps. The timeout-minutes variable is optional and only included to ensure we remove any long-running workflows. This workflow should come nowhere near the 15-minute mark. Any more than that, and it should signal to us that there is a problem in the workflow. We can see the runs-on key at the end of this code block. This workflow uses the ubuntu-latest flavor, but other options are available. For example, we can use a Windows, Ubuntu, or macOS runner (machines that execute jobs in a GitHub Actions workflow).
...
on:
  push:
    branches-ignore:
      - main

jobs:
  dev:
    env:
      LABPASSPHRASE: ${{ secrets.LABPASSPHRASE }}
      CV_TOKEN: ${{ secrets.CV_TOKEN }}
    timeout-minutes: 15
    runs-on: ubuntu-latest
...
Now that we have defined our dev job, we must define what steps will run within this workflow. For this portion, we have the first and second steps in the workflow. The initial step, "Hi" is only used to validate an operational workflow and is not required. Next, the actions/checkout action will check out your repository to make the repository accessible in the workflow. Future workflow steps will then be able to use the relevant repository information to run tasks like building a new application or deploying the latest state of a network.
...
jobs:
  dev:
    env:
      LABPASSPHRASE: ${{ secrets.LABPASSPHRASE }}
      CV_TOKEN: ${{ secrets.CV_TOKEN }}
    timeout-minutes: 15
    runs-on: ubuntu-latest
    steps:
      - name: Hi
        run: echo "Hello World!"

      - name: Checkout
        uses: actions/checkout@v4
...
Finally, the setup Python and install requirements action above the pre-commit step installs Python dependencies in this workflow.
...
    steps:
      - name: Hi
        run: echo "Hello World!"

      - name: Checkout
        uses: actions/checkout@v4

      - name: Setup Python
        uses: actions/setup-python@v6

      - name: Install Python requirements
        run: pip3 install requirements.txt

      - name: Run pre-commit on files
        uses: pre-commit/action@v3.0.1
...
Having trouble setting up your GitHub actions?
Check out this great actions linter from GitHub user rhysd. https://rhysd.github.io/actionlint/
pre-commit
To get started with pre-commit, run the following commands in your ATD IDE terminal.
We will leverage pre-commit in our local development workflow and within the pipeline. pre-commit works by running automated checks on Git repositories manually or whenever a Git commit is run. For example, if we wanted all of our YAML files to have a similar structure or follow specific guidelines, we could use a pre-commit "check-yaml" hook. Please note this is just a sample of what pre-commit can do. For a list of hooks, check out their official list. The code block below references the pre-commit configuration file used in our repository.
In pre-commit, we define our jobs under a repos key. This first repo step points to the built-in hooks provided by the pre-commit team. Please note you can use hooks from other organizations. In our case, the checks are fairly simplistic. The first hook checks to ensure our files have no trailing whitespace. The next hook, end-of-file-fixer, ensures every file is empty or ends with one new line. Next, the check YAML hook validates any YAML file in our repository can be loaded as valid YAML syntax. Below is our workflow example leveraging the pre-commit action. This action will read the .pre-commit-config.yaml file in the root of our repository. The files key only checks files within specific directories.
# .pre-commit-config.yaml
# See https://pre-commit.com for more information
# See https://pre-commit.com/hooks.html for more hooks
repos:
  - repo: https://github.com/pre-commit/pre-commit-hooks
    rev: v6.0.0
    hooks:
      - id: trailing-whitespace
        files: labs/L2LS/sites/site_1/group_vars/|labs/L2LS/sites/site_2/group_vars/

      - id: end-of-file-fixer
        exclude_types: [svg, json]
        files: labs/L2LS/sites/site_1/group_vars/|labs/L2LS/sites/site_2/group_vars/

      - id: check-yaml
        files: labs/L2LS/sites/site_1/group_vars/|labs/L2LS/sites/site_2/group_vars/
pre-commit Example
We can look at the benefits of pre-commit by introducing three errors in a group_vars file. This example will use the sites/site_1/group_vars/SITE1_FABRIC_SERVICES.yml file. Under VLAN 20, we can add extra whitespace after any entry, extra newlines, and move the s1-spine2 key under the s1-spine1 key.
          - id: 20
            name: 'Twenty'
            tags: [ "App" ]
            enabled: true
            ip_virtual_router_addresses:
              - 10.20.20.1
            nodes:
              - node: s1-spine1
                ip_address: 10.20.20.2/24
                - node: s1-spine2 # <- Should not be nested under s1-spine1
                  ip_address: 10.20.20.3/24
# <- Newline
# <- Newline
We can run pre-commit manually by running the following command:
trim trailing whitespace.................................................Passed
fix end of files.........................................................Failed
- hook id: end-of-file-fixer
- exit code: 1
- files were modified by this hook

Fixing labs/L2LS/sites/site_1/group_vars/SITE1_FABRIC_SERVICES.yml

check yaml...............................................................Failed
- hook id: check-yaml
- exit code: 1

while parsing a block mapping
  in "labs/L2LS/sites/site_1/group_vars/SITE1_FABRIC_SERVICES.yml", line 25, column 17
did not find expected key
  in "labs/L2LS/sites/site_1/group_vars/SITE1_FABRIC_SERVICES.yml", line 27, column 17

➜  ci-workshops-avd git:(main) ✗
We can see the two failures. pre-commit hooks will try and fix errors. However, pre-commit does not assume our intent with the YAML file; that fix is up to us. If you correct the indentation in the file and rerun pre-commit, you will see all passes.
          - id: 20
            name: 'Twenty'
            tags: [ "App" ]
            enabled: true
            ip_virtual_router_addresses:
              - 10.20.20.1
            nodes:
              - node: s1-spine1
                ip_address: 10.20.20.2/24
              - node: s1-spine2 # <- Indentation fixed
                ip_address: 10.20.20.3/24
# <- One newline
➜  ci-workshops-avd git:(main) ✗ pre-commit run -a
trim trailing whitespace.................................................Passed
fix end of files.........................................................Passed
check yaml...............................................................Passed
➜  ci-workshops-avd git:(main)
Filter Changes to the Pipeline
Currently, our workflow will build and deploy configurations for both sites. This is true even if we only have changes relevant to one site. We can use a path filter to check if changes within specific directories have been modified, signaling that a new build and deployment are required. Please take note of the id key. This will be referenced in our upcoming workflow steps.
...
      - name: Run pre-commit on files
        uses: pre-commit/action@v3.0.1

      - name: Check paths for sites/site_1
        uses: dorny/paths-filter@v3
        id: filter-site1
        with:
          filters: |
            workflows:
              - 'labs/L2LS/sites/site_1/**'

      - name: Check paths for sites/site_2
        uses: dorny/paths-filter@v3
        id: filter-site2
        with:
          filters: |
            workflows:
              - 'labs/L2LS/sites/site_2/**'
...
Conditionals to Control Flow
The Ansible collection install and test configuration steps have the conditional key of if. This maps to each path filter check step we used earlier. For example, the first path check has an id of filter-site1. We can reference the id in our workflow as steps.filter-site1.outputs.workflows. If this is set to true, a change will register in our check, and the test build step for site 1 will run. One difference is the Ansible collection install uses the || (or) operator. The "or" operator allows us to control when Ansible collections are installed. The collections will be installed if a change is registered in either filter-site1 or filter-site2.
...
      - name: Install collections
        run: ansible-galaxy collection install -r requirements.yml
        if: steps.filter-site1.outputs.workflows == 'true' || steps.filter-site2.outputs.workflows == 'true'

      - name: Test configuration for site1
        run: make build-site-1
        working-directory: labs/L2LS/
        if: steps.filter-site1.outputs.workflows == 'true'

      - name: Test configuration for site2
        run: make build-site-2
        working-directory: labs/L2LS/
        if: steps.filter-site2.outputs.workflows == 'true'
At this point, make sure both workflow files (dev.yml and prod.yml) within the .github/workflows directory are not commented out. An example of the dev.yml file is below.
.github/workflows/dev.yml
name: Test the upcoming changes

on:
  push:
    branches-ignore:
      - main

jobs:
  dev:
    env:
      LABPASSPHRASE: ${{ secrets.LABPASSPHRASE }}
      CV_TOKEN: ${{ secrets.CV_TOKEN }}
    timeout-minutes: 15
    runs-on: ubuntu-latest
    steps:
      - name: Hi
        run: echo "Hello World!"

      - name: Checkout
        uses: actions/checkout@v4

      - name: Setup Python
        uses: actions/setup-python@v6

      - name: Install Python requirements
        run: pip3 install requirements.txt

      - name: Run pre-commit on files
        uses: pre-commit/action@v3.0.1

      - name: Check paths for sites/site_1
        uses: dorny/paths-filter@v3
        id: filter-site1
        with:
          filters: |
            workflows:
              - 'labs/L2LS/sites/site_1/**'

      - name: Check paths for sites/site_2
        uses: dorny/paths-filter@v3
        id: filter-site2
        with:
          filters: |
            workflows:
              - 'labs/L2LS/sites/site_2/**'

      - name: Install collections
        run: ansible-galaxy collection install -r requirements.yml
        if: steps.filter-site1.outputs.workflows == 'true' || steps.filter-site2.outputs.workflows == 'true'

      - name: Test configuration for site1
        run: make build-site-1
        working-directory: labs/L2LS/
        if: steps.filter-site1.outputs.workflows == 'true'

      - name: Test configuration for site2
        run: make build-site-2
        working-directory: labs/L2LS/
        if: steps.filter-site2.outputs.workflows == 'true'
Step 8 - Day-2 Operations - New service (VLAN)
This example workflow will add two new VLANs to our sites. Site 1 will add VLAN 25, and site 2 will add VLAN 45. An example of the updated group_vars is below. The previous workshop modified the configuration of our devices directly through eAPI. This example will leverage GitHub actions with CloudVision to update our nodes.
labs/L2LS/sites/site_1/group_vars/SITE1_FABRIC_SERVICES.yml
---
tenants:
  - name: MY_FABRIC
    vrfs:
      - name: default
        svis:
          - id: 10
            name: 'Ten'
            tags: [ "Web" ]
            enabled: true
            ip_virtual_router_addresses:
              - 10.10.10.1
            nodes:
              - node: s1-spine1
                ip_address: 10.10.10.2/24
              - node: s1-spine2
                ip_address: 10.10.10.3/24
          - id: 20
            name: 'Twenty'
            tags: [ "App" ]
            enabled: true
            ip_virtual_router_addresses:
              - 10.20.20.1
            nodes:
              - node: s1-spine1
                ip_address: 10.20.20.2/24
              - node: s1-spine2
                ip_address: 10.20.20.3/24
          - id: 25
            name: 'Twenty-five'
            tags: [ "Wifi" ]
            enabled: true
            ip_virtual_router_addresses:
              - 10.25.25.1
            nodes:
              - node: s1-spine1
                ip_address: 10.25.25.2/24
              - node: s1-spine2
                ip_address: 10.25.25.3/24
Build the updates locally (optional)
The pipeline will run the build and deploy steps for us with these relevant changes. We can also run the build steps locally to see all our pending updates.
Feel free to check out the changes made to your local files. Please make sure the GitHub workflows are uncommented. We can now push all of our changes and submit a pull request.
Note
The GitHub workflows are located in the .github/workflows directory.
Viewing Actions
If you navigate back to your GitHub repository, you should see an action executing.
- Click
Actions - Click on the latest action
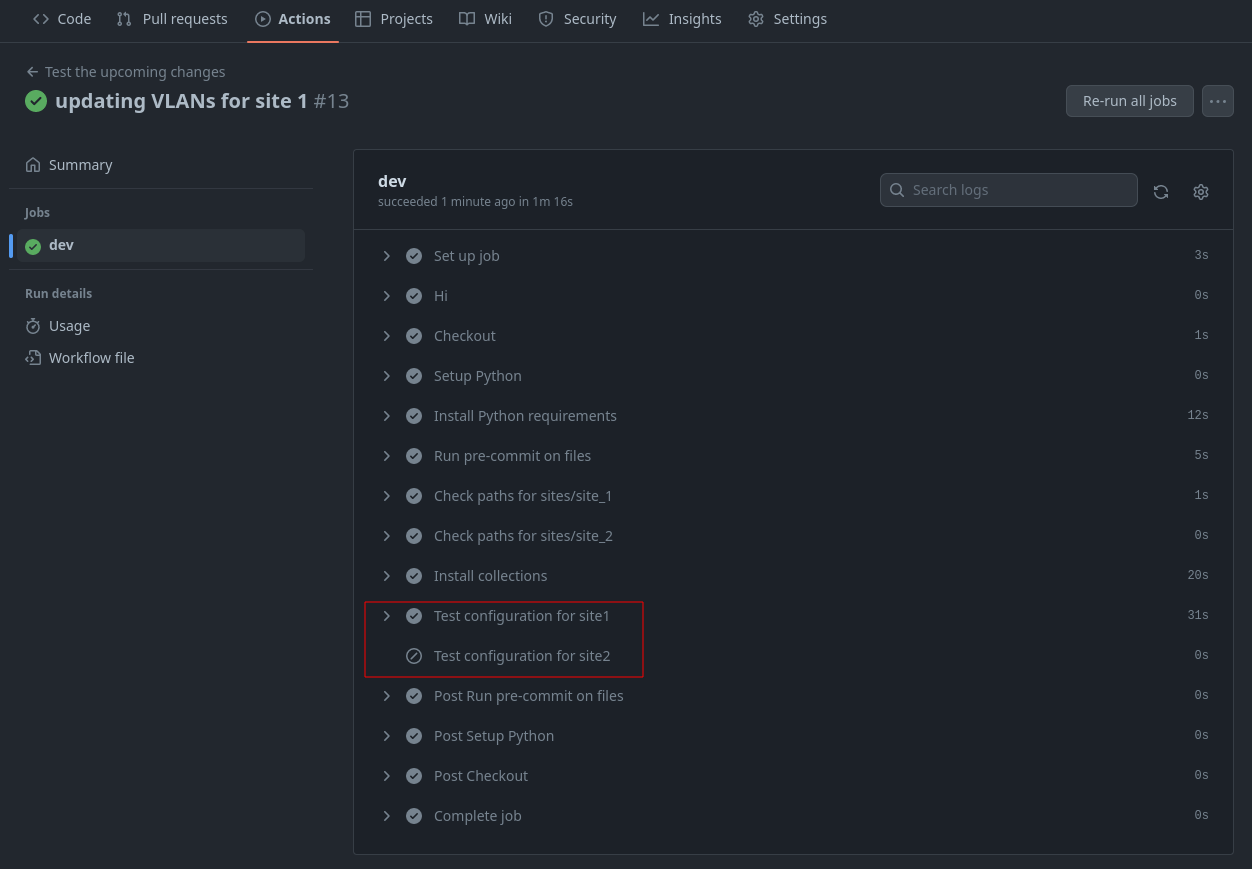
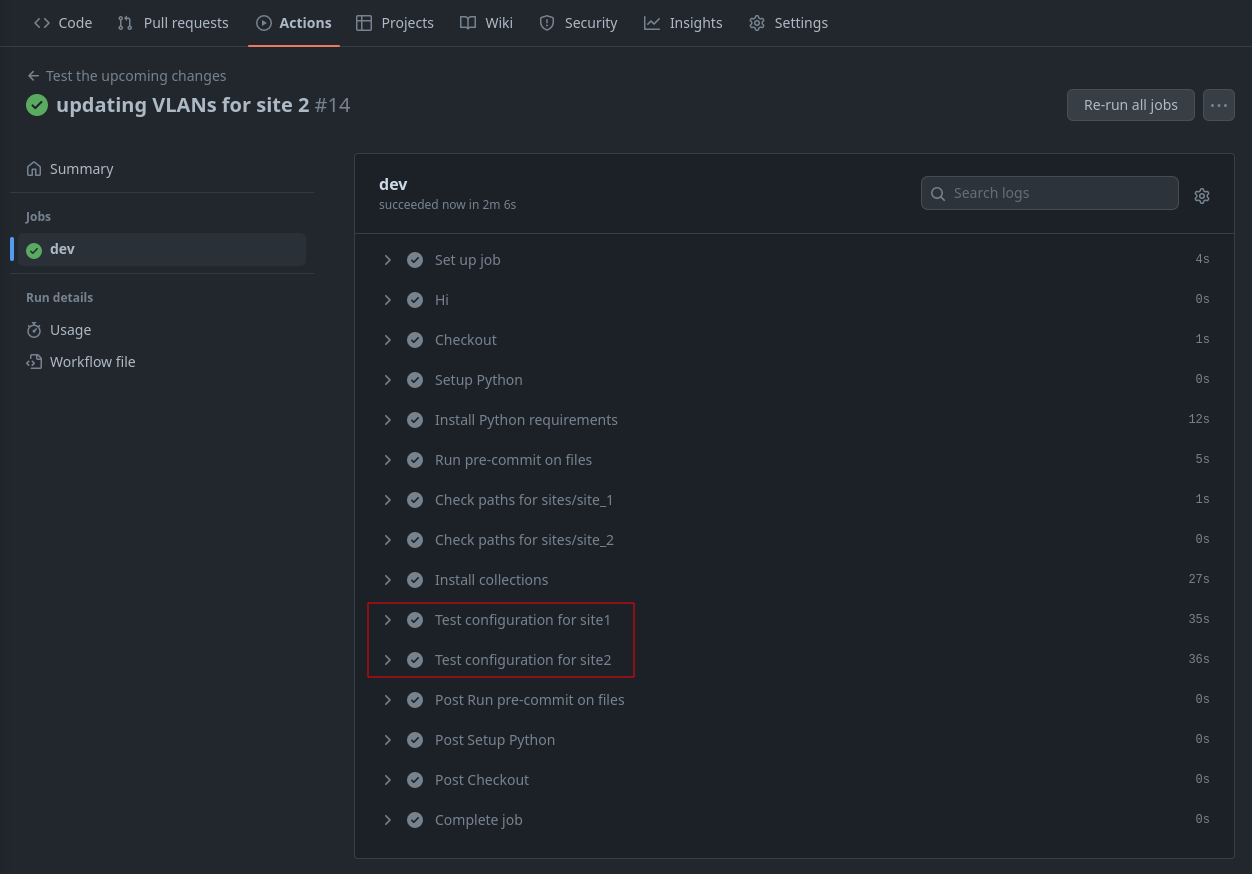
Since this is a development branch, we are only testing for valid variable files so that AVD can successfully build our configurations. We can run one more example before deploying to production. You may notice the test configuration step was only initiated for site 1 and was skipped for site 2 (no changes). You can finish this example by updating the site 2 fabric services file.
labs/L2LS/sites/site_2/group_vars/SITE2_FABRIC_SERVICES.yml
---
tenants:
  - name: MY_FABRIC
    vrfs:
      - name: default
        svis:
          - id: 30
            name: 'Thirty'
            tags: [ "DB" ]
            enabled: true
            ip_virtual_router_addresses:
              - 10.30.30.1
            nodes:
              - node: s2-spine1
                ip_address: 10.30.30.2/24
              - node: s2-spine2
                ip_address: 10.30.30.3/24
          - id: 40
            name: 'Forty'
            tags: [ "DMZ" ]
            enabled: true
            ip_virtual_router_addresses:
              - 10.40.40.1
            nodes:
              - node: s2-spine1
                ip_address: 10.40.40.2/24
              - node: s2-spine2
                ip_address: 10.40.40.3/24
          - id: 45
            name: 'Forty-five'
            tags: [ "Guest" ]
            enabled: true
            ip_virtual_router_addresses:
              - 10.45.45.1
            nodes:
              - node: s2-spine1
                ip_address: 10.45.45.2/24
              - node: s2-spine2
                ip_address: 10.45.45.3/24
Once complete, the GitHub actions will show changes on sites 1 and 2.
Step 9 - Creating a Pull Request to Deploy Updates (main branch)
We have activated our GitHub workflows and tested our configurations. We are now ready to create a pull request.
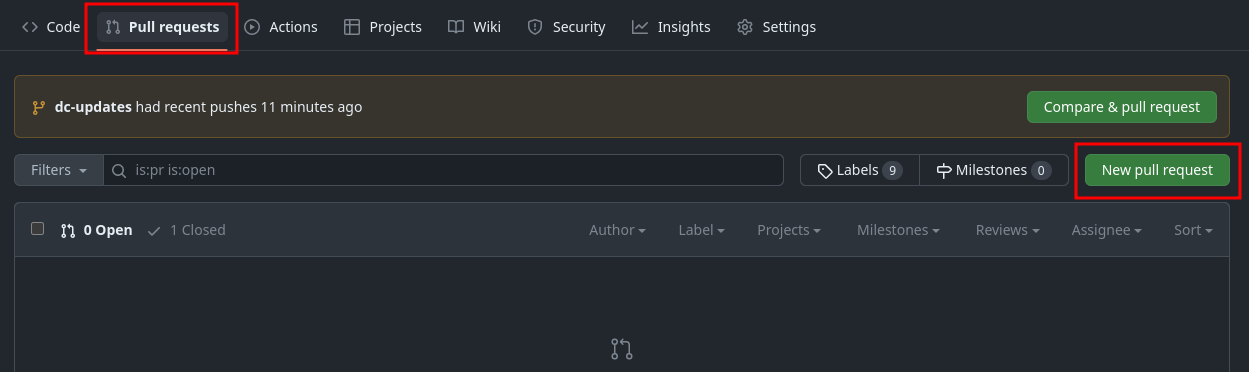
In your GitHub repository, you should see a tab for Pull requests.
- Click on
Pull requests - Click on
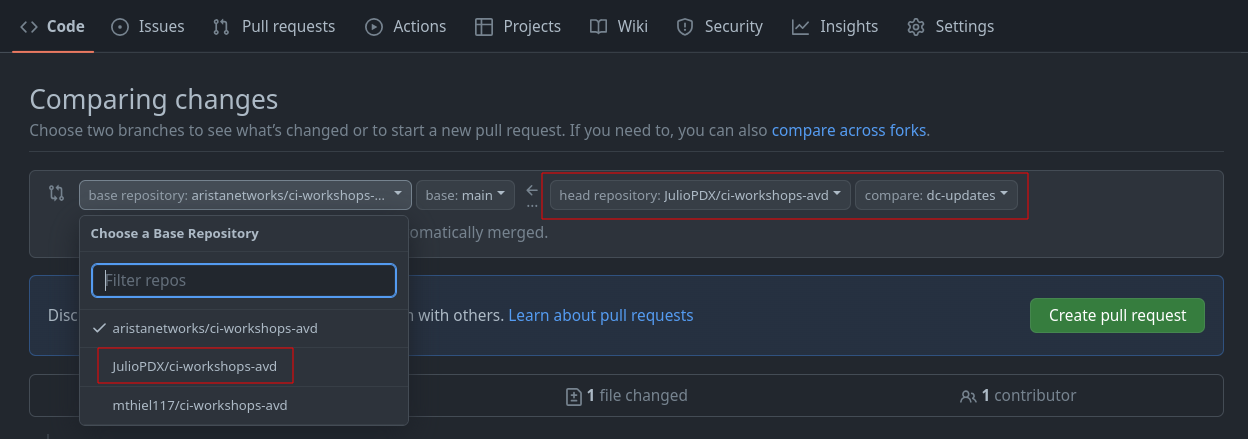
New pull request - Change the base repository to be your fork
- Change the compare repository to
dc-updates - Click
Create pull request
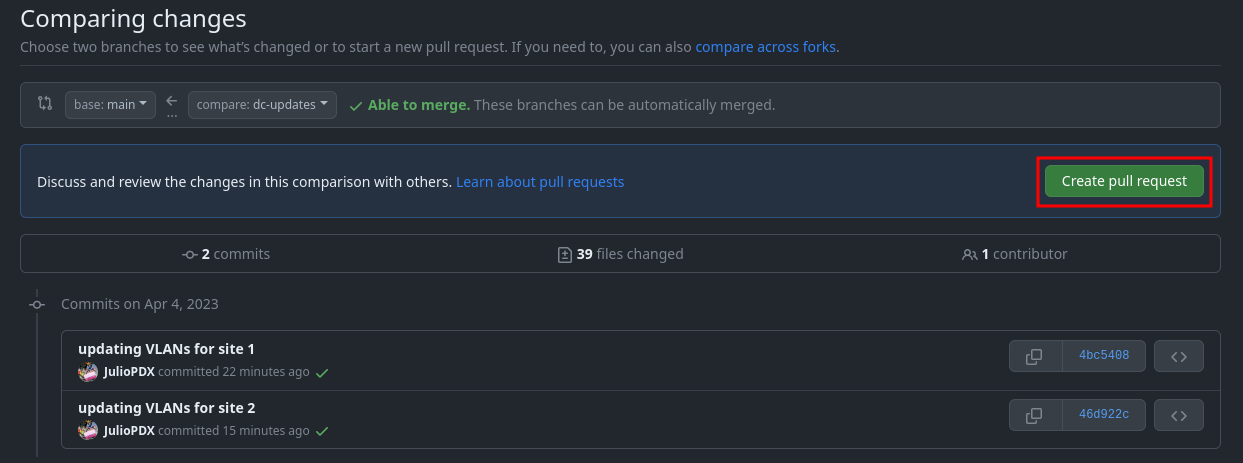
Add a title and enough of a summary to get the point across to other team members.
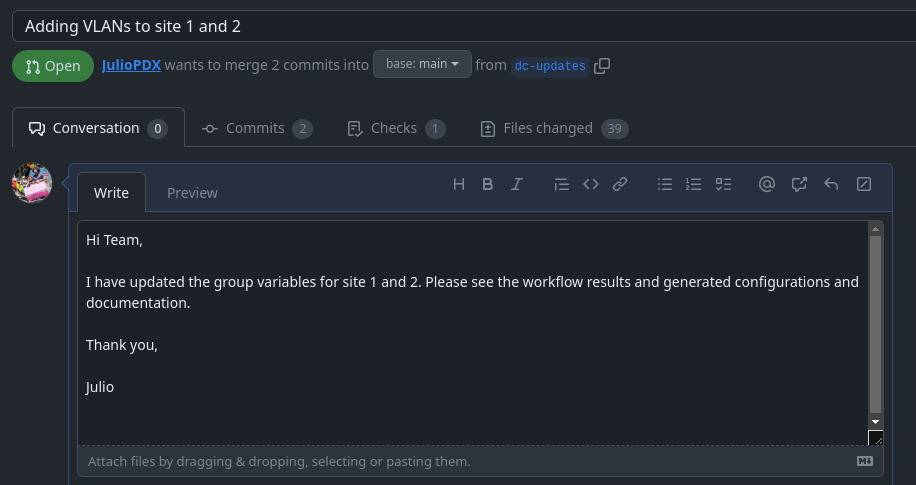
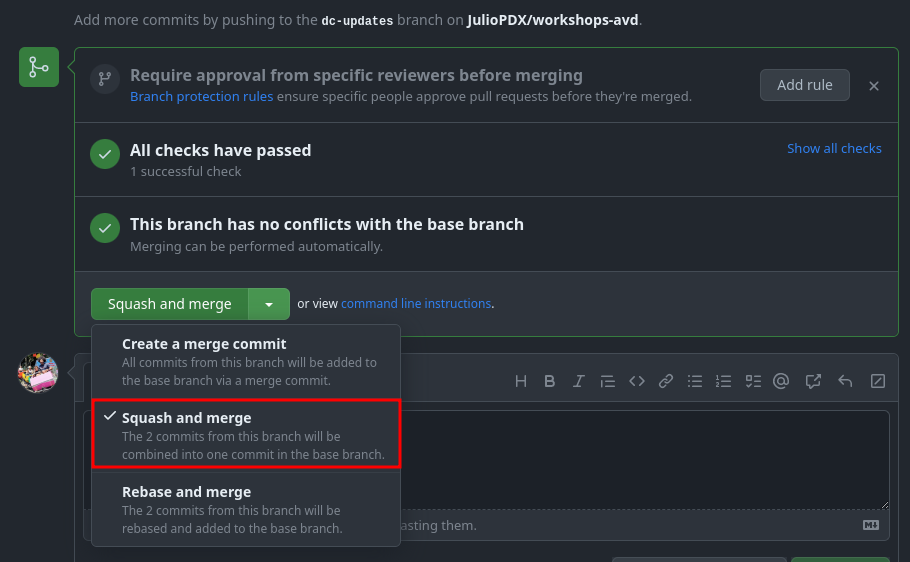
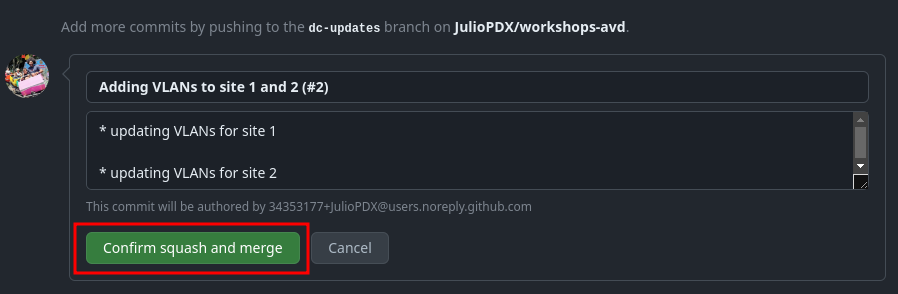
Once this is complete, click Create pull request. Since all checks have passed, we can merge our new pull request. If you have multiple options on the type of merge, select squash and merge.
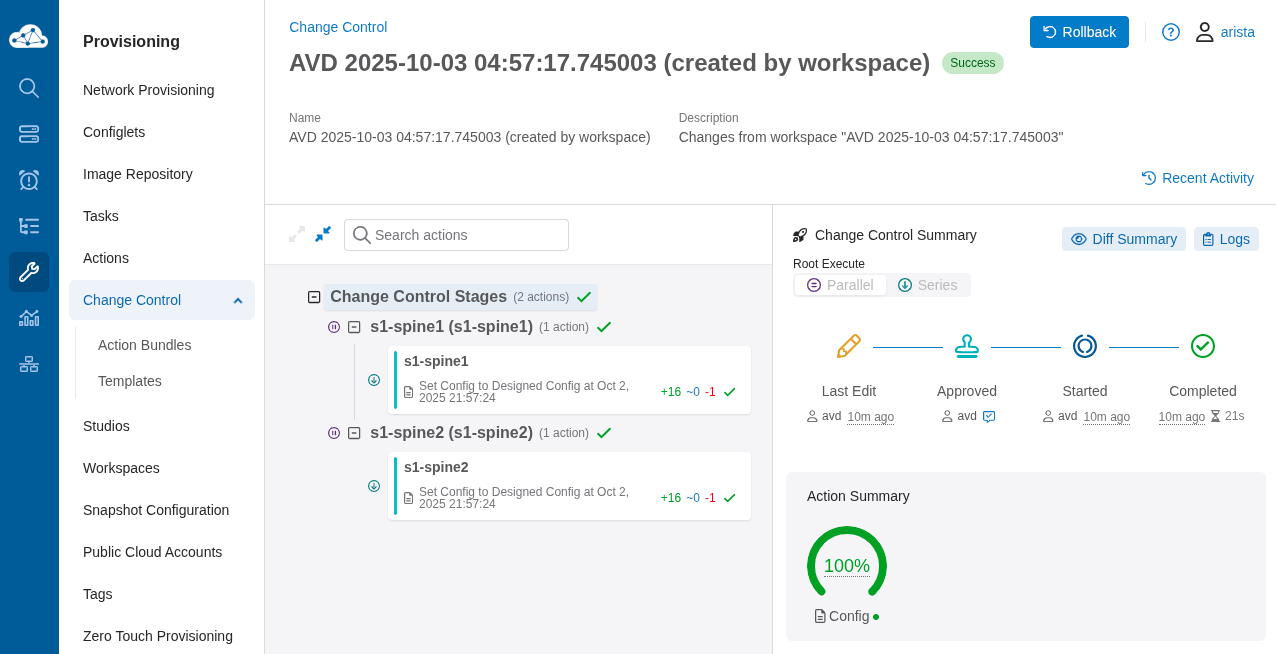
At this point, this will kick off our production workflow (prod.yml) against the main branch. The prod.yml workflow will build and deploy our updates with CloudVision. If you go to the "Provisioning" tab of CloudVision, you should be able to see change controls executing. This workflow will automatically run the pending change controls for us. We can optionally connect to one of the spines at either site to see the new VLANs.
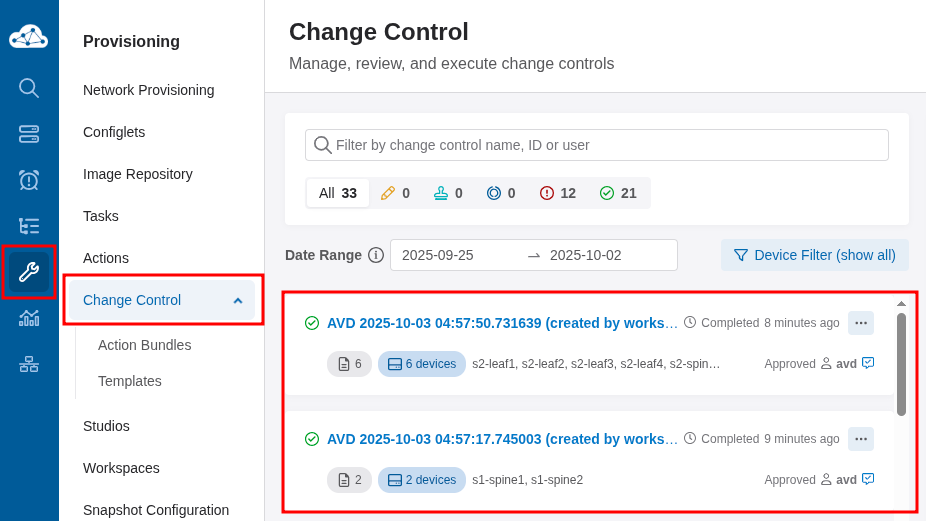
Note
Depending on the scope of your changes in this environment, change controls may be generated for the spines or for the entire network. In this instance, the changes affect only the spine nodes.
s1-spine1#show vlan
VLAN  Name                             Status    Ports
----- -------------------------------- --------- -------------------------------
1     default                          active
10    Ten                              active    Cpu, Po1, Po2
20    Twenty                           active    Cpu, Po1, Po4
25    Twenty-five                      active    Cpu, Po1
4093  LEAF_PEER_L3                     active    Cpu, Po1
4094  MLAG_PEER                        active    Cpu, Po1

s1-spine1#
################################################################################
s2-spine1#show vlan
VLAN  Name                             Status    Ports
----- -------------------------------- --------- -------------------------------
1     default                          active
30    Thirty                           active    Cpu, Po1, Po2
40    Forty                            active    Cpu, Po1, Po4
45    Forty-five                       active    Cpu, Po1
4093  LEAF_PEER_L3                     active    Cpu, Po1
4094  MLAG_PEER                        active    Cpu, Po1

s2-spine1#
The Subtle Difference Between Prod and Dev
You may recall that at the start of this lab, the dev.yml actions file ignored the branch main. This is intentional, as we do not want our development workflows to run against the production branch and possibly make changes to the live network. Since we merged our changes into the main branch, the run of the prod.yml actions file will be triggered. Below is a snippet of the production actions file, which is now set to run against any pushes to the main branch.
The rest of the workflow file is the exact same as dev.yml. The other subtle difference is that now, depending on the files changed, we will run the build playbooks as well as the playbooks responsible for deploying with CloudVision.
jobs:
  deploy-prod:
    env:
      LABPASSPHRASE: ${{ secrets.LABPASSPHRASE }}
      CV_TOKEN: ${{ secrets.CV_TOKEN }}
    timeout-minutes: 15
    runs-on: ubuntu-latest
    steps:
      - name: Hi
        run: echo "Hello World!"

      - name: Checkout
        uses: actions/checkout@v4

      - name: Setup Python
        uses: actions/setup-python@v6

      - name: Install Python requirements
        run: pip3 install requirements.txt

      - name: Run pre-commit on files
        uses: pre-commit/action@v3.0.1

      - name: Check paths for sites/site_1
        uses: dorny/paths-filter@v3
        id: filter-site1
        with:
          filters: |
            workflows:
              - 'labs/L2LS/sites/site_1/**'

      - name: Check paths for sites/site_2
        uses: dorny/paths-filter@v3
        id: filter-site2
        with:
          filters: |
            workflows:
              - 'labs/L2LS/sites/site_2/**'

      - name: Install collections
        run: ansible-galaxy collection install -r requirements.yml
        if: steps.filter-site1.outputs.workflows == 'true' || steps.filter-site2.outputs.workflows == 'true'

      - name: Build and deploy site1
        run: make build-site-1 cvp-site-1
        working-directory: labs/L2LS/
        if: steps.filter-site1.outputs.workflows == 'true'

      - name: Build and deploy site2
        run: make build-site-2 cvp-site-2
        working-directory: labs/L2LS/
        if: steps.filter-site2.outputs.workflows == 'true'
Below is an example of the Ansible playbook that leverages the arista.avd.cv_deploy role to push new node configurations with CloudVision.
---
- name: Deploy to CloudVision
  hosts: "{{ target_hosts }}"
  gather_facts: false

  tasks:

    - name: Deploy to Static Configuration Studio
      ansible.builtin.import_role:
        name: arista.avd.cv_deploy
      vars:
        cv_run_change_control: true
        cv_server: # <atd-topo12345.topo.testdrive.arista.com>
Summary
Congratulations, you have successfully deployed a CI/CD pipeline with GitHub Actions, AVD, and CloudVision. Feel free to make additional site changes or extend the testing pieces.
Note
If your topology shuts down or time elapses, you must install the requirements, Git configuration, and GitHub authentication.