Welcome to Ansible
What is Ansible
Ansible is a Python-based automation framework. Today, the term "Ansible Automation Platform" can refer to multiple applications, including:
- Ansible Core
- Ansible Galaxy
- Ansible Automation Controller (Previously known as Tower)
- Red Hat Insights
We will be focusing on the first two items during this workshop.
Why use Ansible
Aside from being "agentless", meaning that Ansible does not require any specialized software on the target hosts, Ansible is also straightforward to get started with. While prior coding or experience in automation is helpful, it is optional to get up and running with Ansible. Playbooks are written in YAML, a language that we'll cover in detail in the YAML ("Jinja and YAML") section. For now, rest assured that YAML is a human-readable language, which is why it's accessible to start our Ansible journey.
There is an extensive and very active user and development community with Ansible. The project itself is open source, with the GitHub repository available here. The popularity of Ansible has led to broad vendor support, spanning multiple technology silos. Network, Compute, Storage, Cloud, Security, and more can all be automated via Ansible.
Finally, all that is required to get started is a Linux host with Python installed. A single Ansible Control Node (ACN) can manage hundreds or thousands of endpoints.
Important Note Before Getting Started
This section will make use of the fork of the Workshops GitHub repository that was created during the Git section. If you have not made a fork of this repository and cloned it into the /home/coder/project/labfiles/ directory of
your lab environment's VS Code IDE, please do so before moving forward.
Ansible Initial Setup
There are multiple methods of installing Ansible on the Ansible Control Node. The most popular way is to leverage pip, and is covered in detail here.
We will be using ansible-core, which is a lightweight minimalist installation of Ansible which does not include extra modules, plugins, etc. With this approach, we can use Ansible Galaxy (covered later in this section) to install collections containing the modules, plugins, and roles we need. For those familiar with Python, think of Ansible Galaxy as pypi.org, and Ansible Collections as Python modules.
Note
Ansible is already installed in the Arista Test Drive lab topology, so we won't need to perform any installation-related tasks.
Below is an example of installing ansible-core via pip on Ubuntu 20.04:
#If necessary, install Python3
sudo apt install update && upgrade
sudo apt install python3 python3-pip --yes

# Install Ansible Core
pip3 install ansible-core
It is that easy to get started!
Before running any commands, let's first ensure that we're in the /home/coder/project/labfiles/ci-workshops-fundamentals/ansible directory.
Next, we'll confirm that Ansible is installed by running the ansible --version in the terminal. This should yield output similar to below:
ansible [core 2.12.10]
  config file = /home/coder/project/labfiles/ci-workshops-fundamentals/ansible/ansible.cfg
  configured module search path = ['/home/coder/.ansible/plugins/modules', '/usr/share/ansible/plugins/modules']
  ansible python module location = /home/coder/.local/lib/python3.9/site-packages/ansible
  ansible collection location = /home/coder/.ansible/collections
  executable location = /home/coder/.local/bin/ansible
  python version = 3.9.2 (default, Feb 28 2021, 17:03:44) [GCC 10.2.1 20210110]
  jinja version = 3.1.2
  libyaml = True
All of the information displayed above is important. It can help troubleshoot why something may not work as expected when working with Ansible.
Control Node and Managed Nodes
Two important initial terms are the Ansible Control Node and Managed Node.
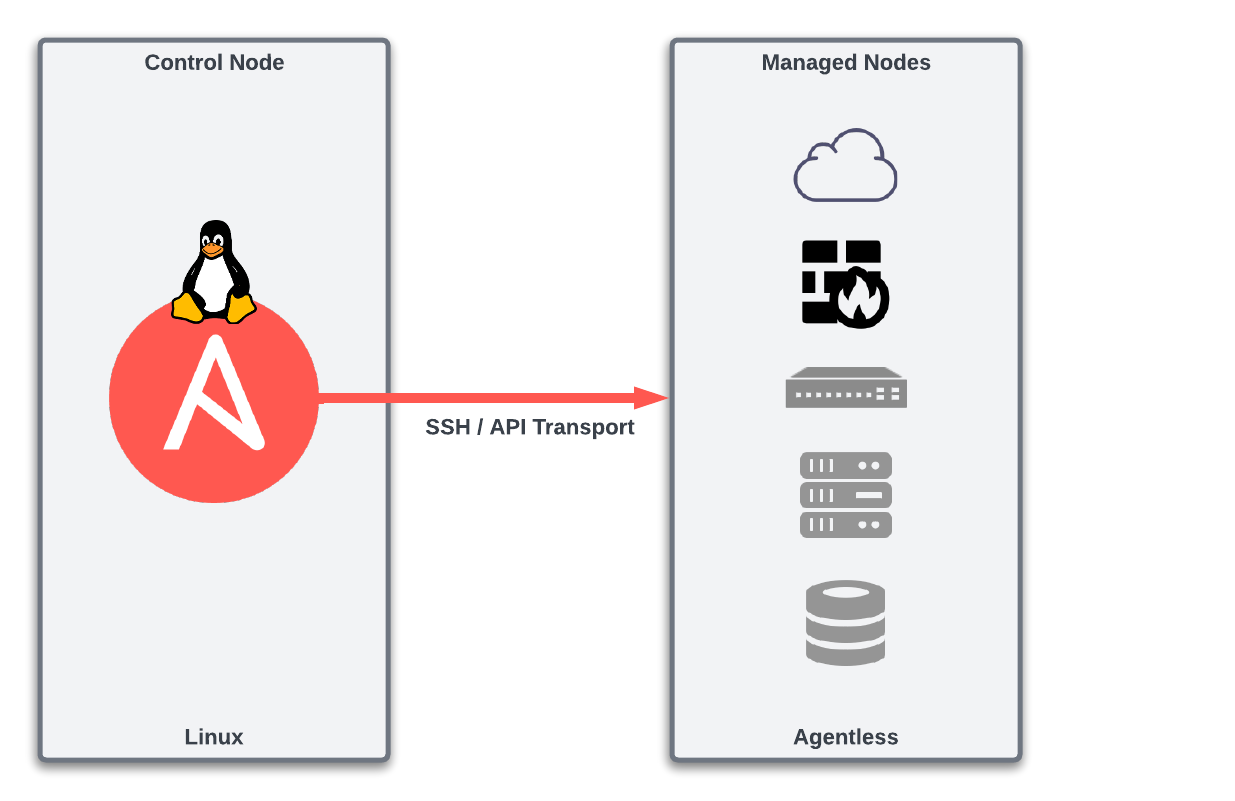
The Control Node is where our playbooks are executed from. This Node then connects to the Managed Nodes to interact with them to perform the desired tasks. How the Control Node interacts with the Managed Node depends on the type of operating system running on the Managed Node. For example, suppose the Managed Node is a Linux server. In that case, the Control Node will "ship" the Python code associated with the tasks to the Managed Node. Then, the Managed Node will locally execute that code to complete the tasks.
What about the lab environment?
In our ATD lab environment, the Control Node is our JumpHost from which we're running our VS Code IDE.
The Managed Nodes are switches that make up our lab's network topology.
Suppose the Managed Node is a network device. In that case, the Control Node will locally execute the Python code associated with the tasks and then interact with the network devices via SSH or API to complete the tasks.
The Control Node must be a Linux host (Ubuntu, CentOS, Rocky, Debian, etc.) with Ansible installed. That's it! Really! This is part of what makes Ansible easy and efficient to get started with. It does not require a software suite to be installed to get started. A single Control Node can manage hundreds or thousands of Managed Nodes.
A Managed Node does not need any specialized software installed. In other words, Ansible is agentless. If a Managed Node is a Linux server, it must have Python3 installed. However, no prerequisites are required for Managed Nodes that are network devices, not even Python. This is because the Control Node will locally execute the Python code necessary to complete the tasks on the network device and will then interact as needed with the network device via SSH/API.
Ansible Components
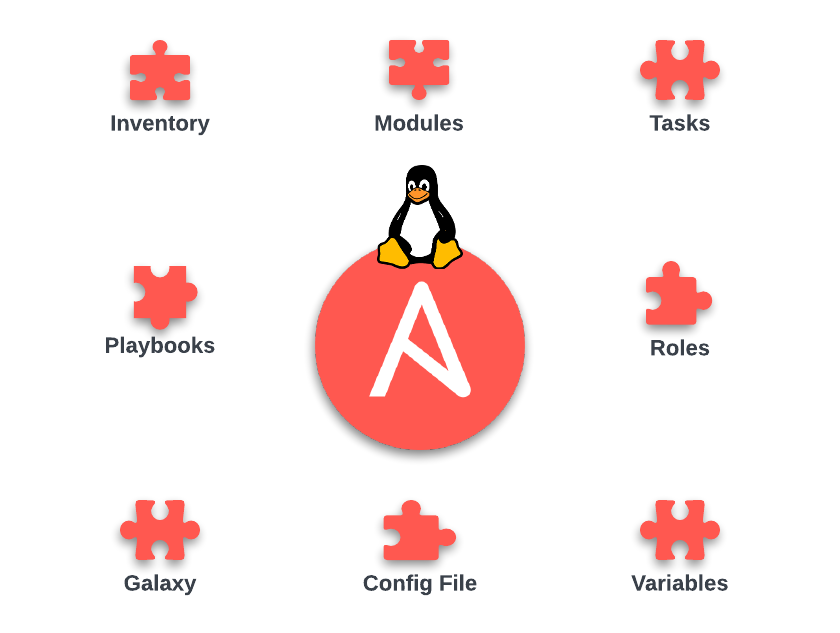
Like any other framework, Ansible is made up of a group of components that come together to make the magic happen. The components we'll focus on during this workshop are shown below.
In the next sections, we'll review these components individually to understand of how each piece fits together.
Config File
The Ansible configuration file is where we set environment variables for our Ansible projects. Many variables can be set in this file, and the most common ones are documented here.
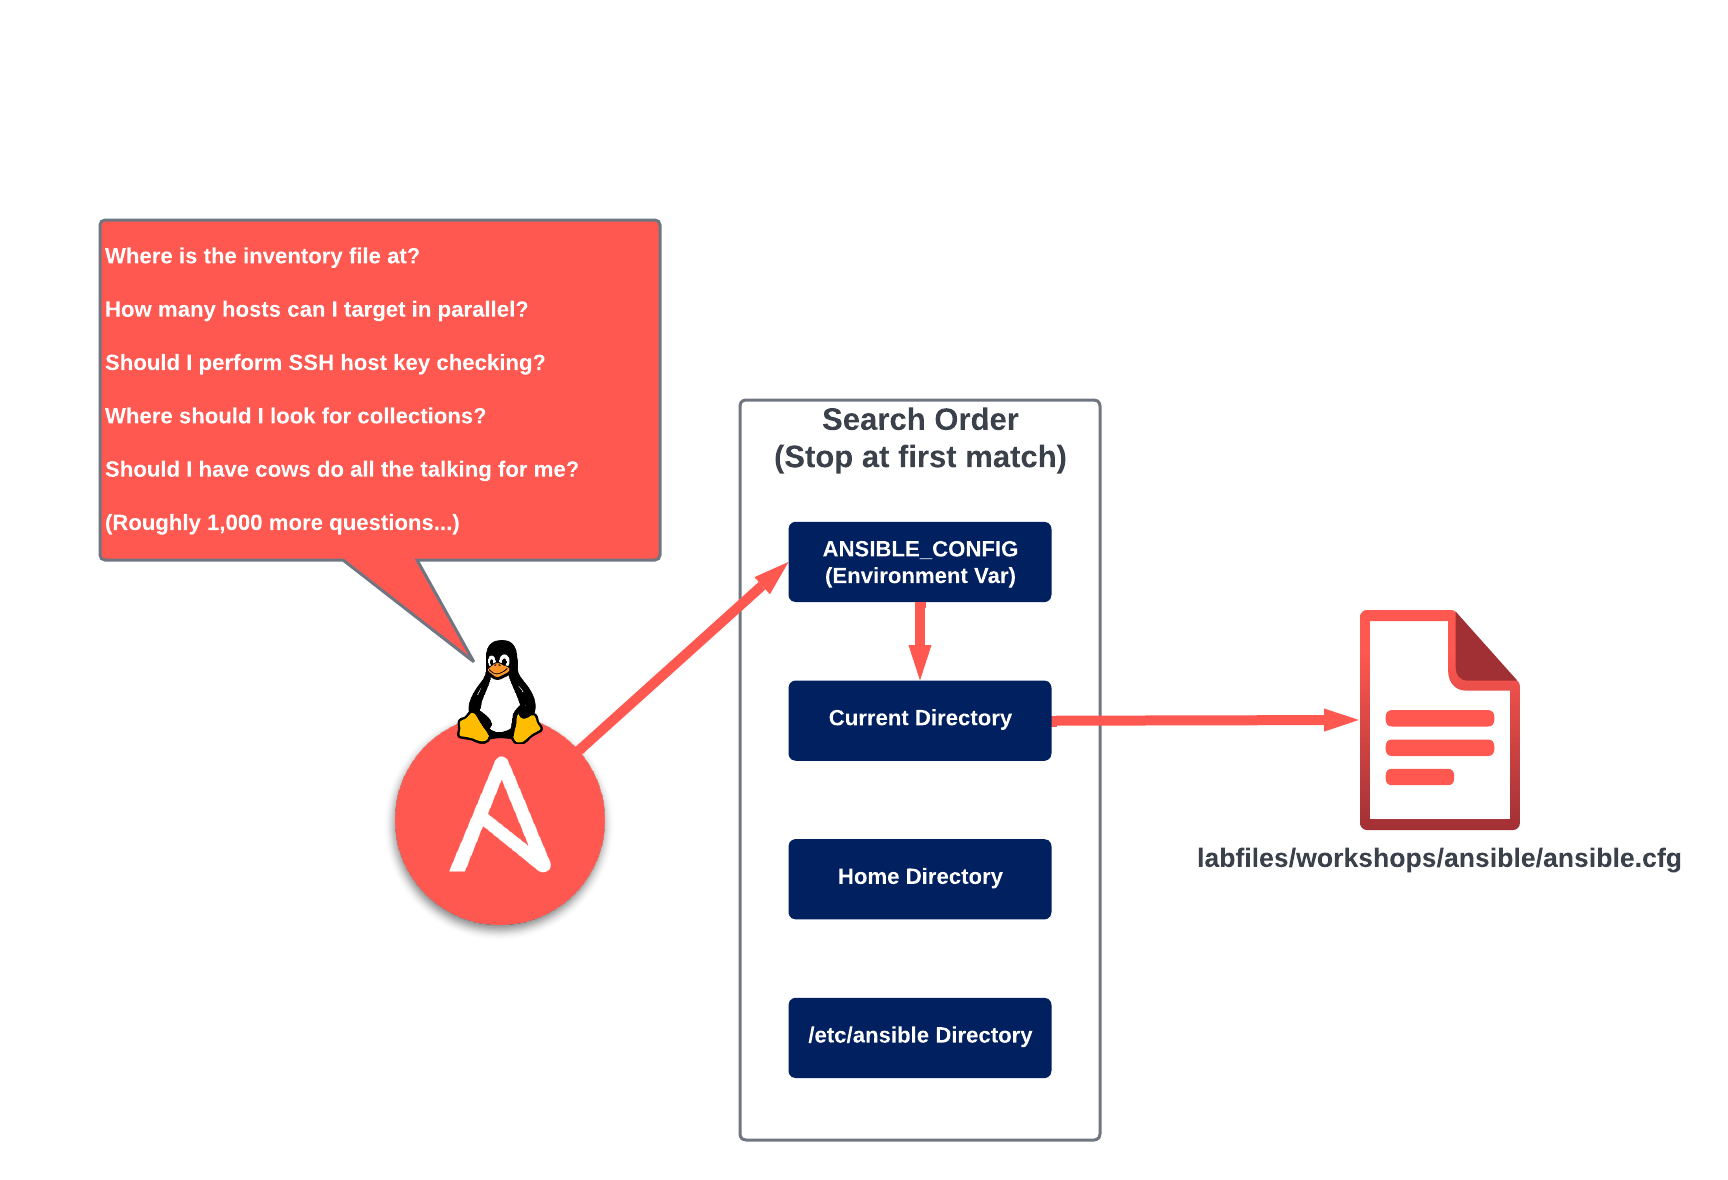
When running an ad-hoc command, or playbook, Ansible will look for the configuration file in the locations listed below. These locations are defined in order of precedence:
-
ANSIBLE_CONFIG (environment variable if set)
-
ansible.cfg (in the current directory)
-
~/.ansible.cfg (in the home directory)
-
/etc/ansible/ansible.cfg
This is illustrated in the image below:
Once Ansible finds an ansible.cfg file, it will only use the configuration options defined in that file. If, for example, an ansible.cfg file exists in the current directory and in /etc/ansible/ansible.cfg, then only the settings found in the ansible.cfg file in the current directory will be used.
Cows?
Yes! First, install cowsay: sudo apt-get update && sudo apt-get install cowsay -y
Next, in the ansible.cfg file, set it to what should be the only acceptable setting, nocows = False.
This feature is udderly ridiculous, and as much as I'd love to milk it for all the Dad jokes possible,
I don't want to start any beef by delaying the workshop...Moo.
Below is an example of the ansible.cfg located in our fork of the Workshops repo:
Example Ansible Configuration File (~/project/labfiles/ci-workshops-fundamentals/ansible/ansible.cfg)
[defaults]

# Disable host key checking by the underlying tools Ansible uses to connect to target hosts
host_key_checking = False

# Location of inventory file containing target hosts
inventory = ./inventory/inventory.yml

# Only gather Ansible facts if explicitly directed to in a given play
gathering = explicit

# Disable the creation of .retry files if a playbook fails
retry_files_enabled = False

# Path(s) to search for installed Ansible Galaxy Collections
collections_paths = ~/.ansible/collections

# Enable additional Jinja2 Extensions (https://jinja.palletsprojects.com/en/3.1.x/extensions/)
jinja2_extensions =  jinja2.ext.loopcontrols,jinja2.ext.do,jinja2.ext.i18n

# Enable the YAML callback plugin, providing much easier to read terminal output. (https://docs.ansible.com/ansible/latest/plugins/callback.html#callback-plugins)
stdout_callback = yaml

# Permit the use of callback plugins when running ad-hoc commands
bin_ansible_callbacks = True

# List of enabled callbacks. Many callbacks shipped with Ansible are not enabled by default
callback_whitelist = profile_roles, profile_tasks, timer

# Maximum number of forks that Ansible will use to execute tasks on target hosts
forks = 15

# Disable cowsay (Why?)
nocows = True

[paramiko_connection]
# Automatically add the keys of target hosts to known hosts
host_key_auto_add = True

[persistent_connection]
# Set the amount of time, in seconds, to wait for response from remote device before timing out persistent connection.
command_timeout = 60

# Set the amount of time, in seconds, that a persistent connection will remain idle before it is destroyed.
connect_timeout = 60
One of the most common settings in the ansible.cfg file is the location of the inventory file, which we will discuss next.
Inventory
In the inventory file, we define the hosts and groups we'll target with our playbooks. The inventory file supports many formats, but the most common are ini and yaml. For our workshop, we'll be using the yaml format.
An example of our inventory file can be seen below:
Example Inventory File (~project/labfiles/ci-workshops-fundamentals/ansible/inventory/inventory.yml)
WORKSHOP_FABRIC:
  children:
    S1:
      children:
        S1_SPINES:
          hosts:
            s1-spine1:
            s1-spine2:
        S1_LEAFS:
          hosts:
            s1-leaf1:
            s1-leaf2:
            s1-leaf3:
            s1-leaf4:
            s1-brdr1:
            s1-brdr2:
            s1-core1:
            s1-core2:
    S2:
      children:
        S2_SPINES:
          hosts:
            s2-spine1:
            s2-spine2:
        S2_LEAFS:
          hosts:
            s2-leaf1:
            s2-leaf2:
            s2-leaf3:
            s2-leaf4:
            s2-brdr1:
            s2-brdr2:
            s2-core1:
            s2-core2:
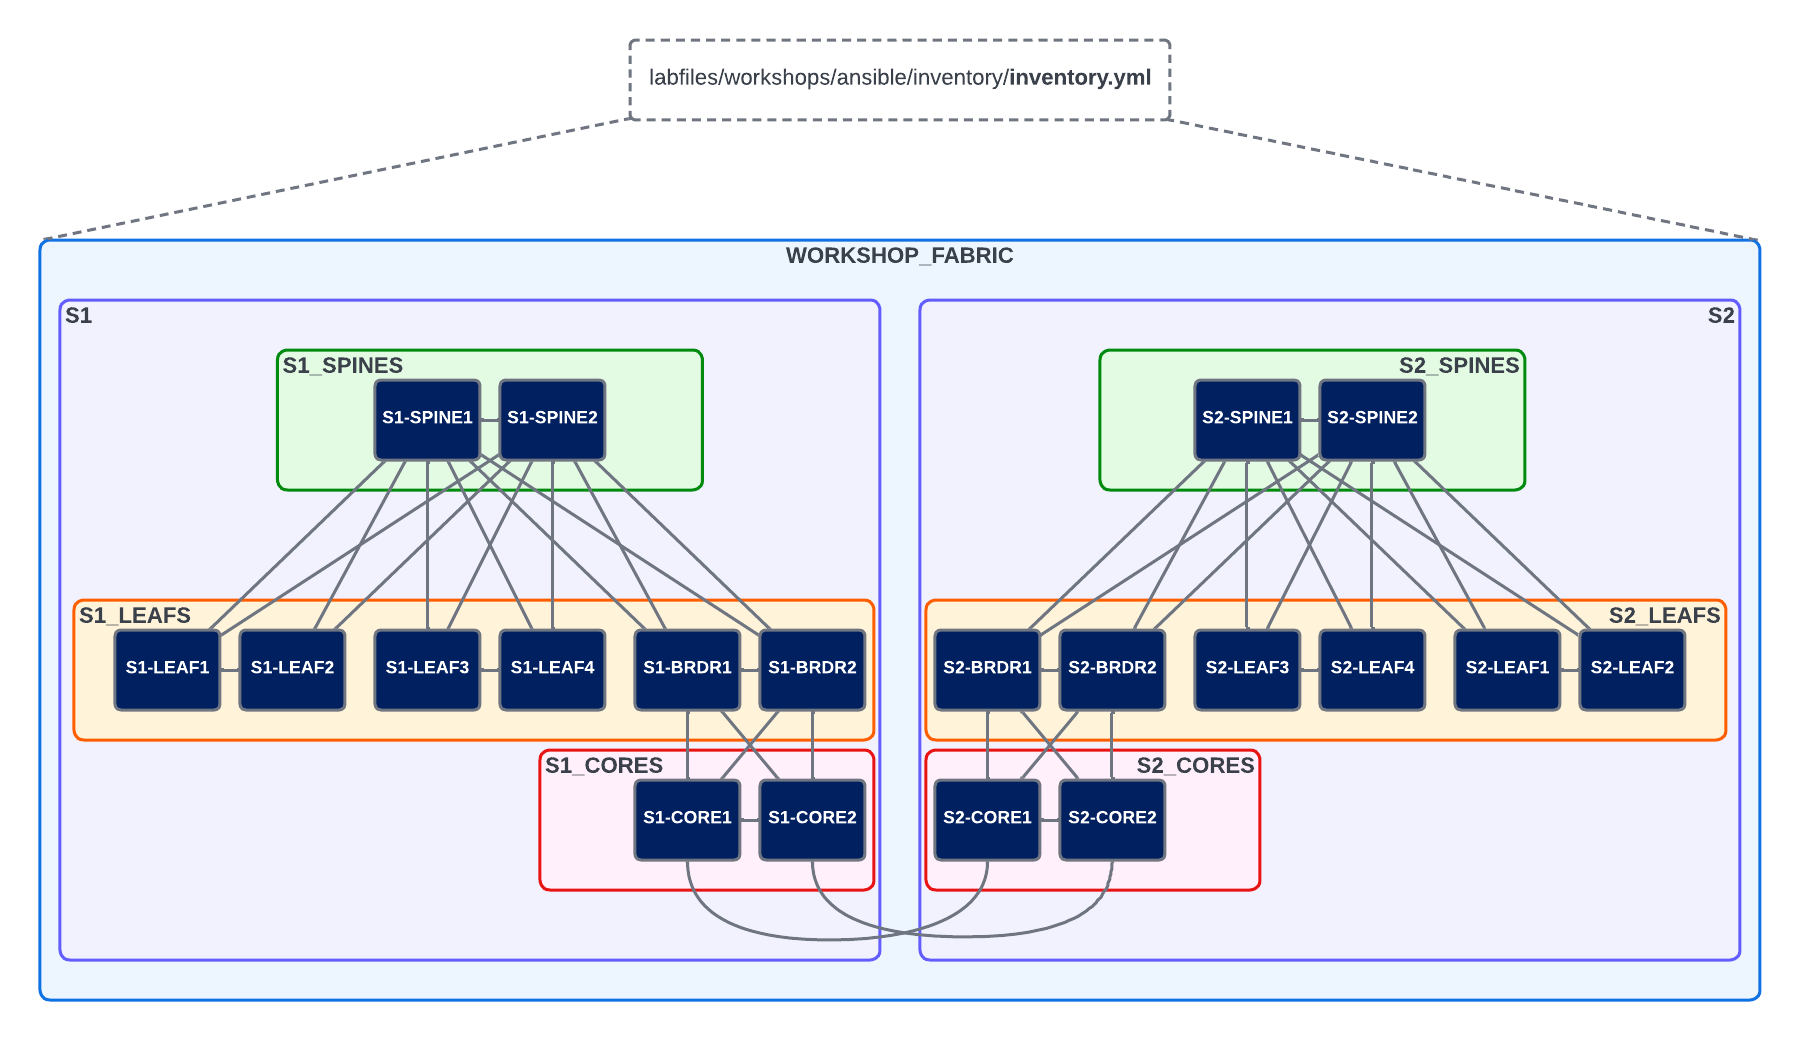
This inventory file defines the hosts and groupings, represented in the image below:
We can validate our inventory by using the ansible-inventory command, which is documented here.
The below command will list the entire inventory, consisting of all hosts/groups and their respective variable values.
If we'd like to get more specific, we can filter the output down to a single host by using the command shown below:
Example inventory output for s1-leaf1
ansible_connection: ansible.netcommon.httpapi
ansible_httpapi_use_ssl: true
ansible_httpapi_validate_certs: false
ansible_network_os: arista.eos.eos
ansible_ssh_pass: arista1c7z
ansible_user: arista
banner_text: This banner came from host_vars/s1-leaf1.YML
mlag:
  enabled: true
  peer_link_int_1: 1
  peer_link_int_2: 6
  side_a: true
mlag_config:
  domain_id: 1000
  peer_link_id: 1000
  side_a:
    ip: 10.0.0.1/30
    peer_ip: 10.0.0.2
  side_b:
    ip: 10.0.0.2/30
    peer_ip: 10.0.0.1
  vlan:
    id: 4094
    name: mlagpeer
    trunk_group_name: mlagpeer
Notice the variables associated with s1-leaf1. Where did these come from? We'll be exploring that next...
Variables
We can define variables in many locations with Ansible. For example, we can explicitly define a variable when running a playbook by using the extra-vars flag.
Reminder
Ensure all commands are run from the /home/coder/project/labfiles/ci-workshops-fundamentals/ansible directory in the terminal on the ATD VS Code IDE instance.
The contents of the playbook we just ran can be seen below. We will look more into the anatomy of a playbook in our next section. For now, note that the name variable is also set in the hello-world.yml playbook
using the vars parameter. When we ran our playbook with extra_vars, this took precedence over the variable defined inside the playbook.
hello_world.yml Playbook (~/project/labfiles/ci-workshops-fundamentals/ansible/playbooks/hello_world.yml)
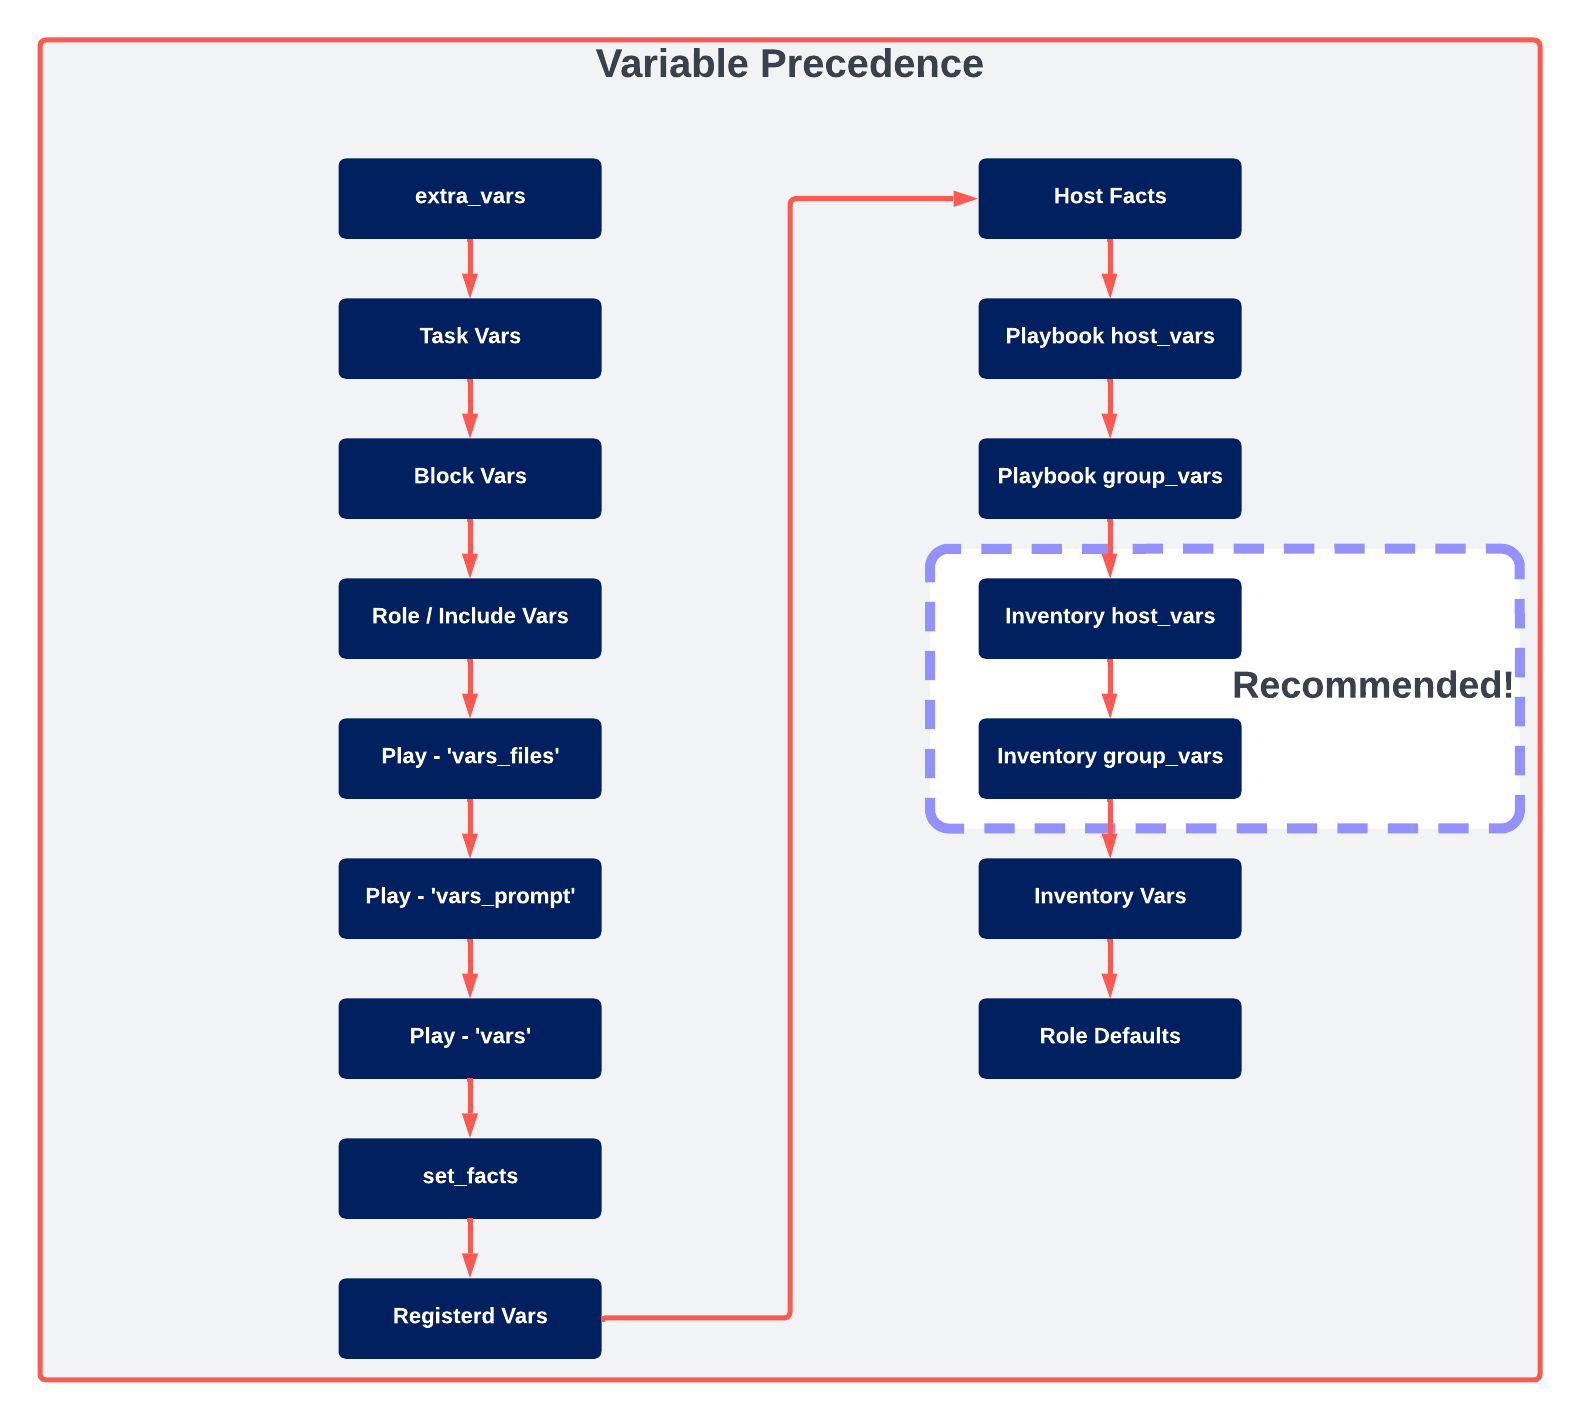
Other valid locations for variables, and their respective precedence, are shown in the diagram below:
As can be expected, there are a LOT of places where we can define variables. Each option has its use case, but the general recommendation is to use host_vars and group_vars as much as possible.
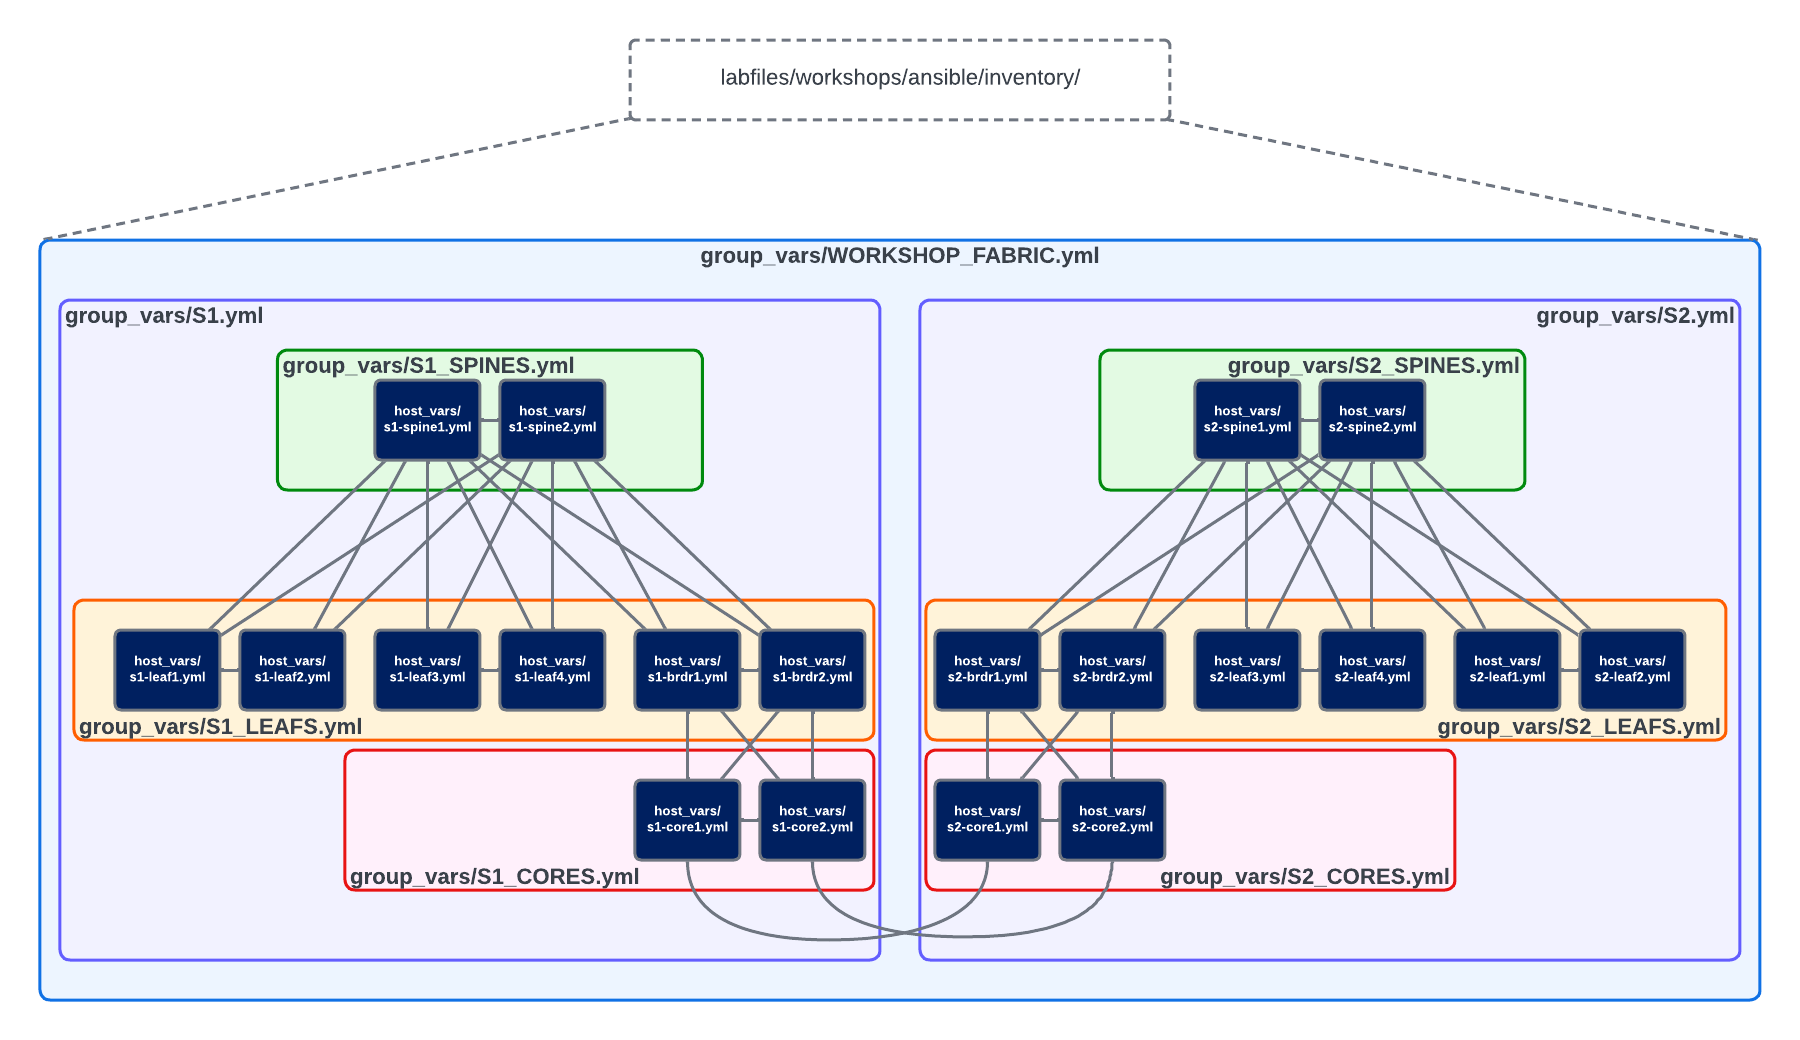
Inside our ~/project/labfiles/ci-workshops-fundamentals/ansible/inventory directory, is a host_vars and group_vars directory. These are special directories that Ansible will use to establish a hierarchy of variables
that maps directly to our inventory hosts and group structure. Each group can have a dedicated yaml file, as can each host. A visual representation of this can be seen below:
In the example above, if we were to define a variable in the ~/project/labfiles/ci-workshops-fundamentals/ansible/inventory/group_vars/WORKSHOP_FABRIC.yml file, then all Managed Nodes contained within that group in our inventory file would inherit that variable. The contents of our WORKSHOP_FABRIC.yml file can be seen below:
WORKSHOP_FABRIC.yml (~/project/labfiles/ci-workshops-fundamentals/ansible/inventory/group_vars/WORKSHOP_FABRIC.yml)
# eAPI connectivity via HTTPS (as opposed to CLI via SSH)
ansible_connection: ansible.netcommon.httpapi

# Specifies that we are using Arista EOS
ansible_network_os: arista.eos.eos

# Use SSL (HTTPS)
ansible_httpapi_use_ssl: true

# Disable SSL certificate validation
ansible_httpapi_validate_certs: false

# Credentials
ansible_user: arista
ansible_ssh_pass: arista1c7z

# Global login banner for all switches in topology
banner_text: "This banner came from group_vars/WORKSHOP_FABRIC.YML"
These values will all be inherited by the nodes in the WORKSHOP_FABRIC group defined in our inventory file.
We can verify this by running ansible-inventory --host s2-spine1 --yaml.
Output of 'ansible-inventory --host s1-spine1 --yaml'
And there they are! All of the variables we had defined in WORKSHOP_FABRIC.yml are present.
If we run this same command but specify s1-leaf3, we'll see some additional and slightly different variables:
Output of 'ansible-inventory --host s1-leaf3 --yaml'
ansible_connection: ansible.netcommon.httpapi
ansible_httpapi_use_ssl: true
ansible_httpapi_validate_certs: false
ansible_network_os: arista.eos.eos
ansible_ssh_pass: arista1c7z
ansible_user: arista
banner_text: This banner came from group_vars/S1.YML
mlag_config:
  domain_id: 1000
  peer_link_id: 1000
  side_a:
    ip: 10.0.0.1/30
    peer_ip: 10.0.0.2
  side_b:
    ip: 10.0.0.2/30
    peer_ip: 10.0.0.1
  vlan:
    id: 4094
    name: mlagpeer
    trunk_group_name: mlagpeer
Whoa! There is certainly more there...and looking at banner_text, we can see that it's different. With group_vars, the closer to the host we get, the higher the precedence of the variable. So, in the case of banner_text, it is defined
in WORKSHOP_FABRIC.yml and S1.yml. Because the S1 group is closer to the host (s1-leaf3) in this case, the banner_text variable defined in S1.yml take priority.
S1.yml (~/project/labfiles/ci-workshops-fundamentals/ansible/inventory/group_vars/S1.yml)
We'll use the mlag_config stuff later. Let's focus on the banner_text variable for now.
Finally, let's take a look at the effective variables on s1-leaf1.
Output of 'ansible-inventory --host s1-leaf1 --yaml'
ansible_connection: ansible.netcommon.httpapi
ansible_httpapi_use_ssl: true
ansible_httpapi_validate_certs: false
ansible_network_os: arista.eos.eos
ansible_ssh_pass: arista1c7z
ansible_user: arista
banner_text: This banner came from host_vars/s1-leaf1.YML
mlag:
  enabled: true
  peer_link_int_1: 1
  peer_link_int_2: 6
  side_a: true
mlag_config:
  domain_id: 1000
  peer_link_id: 1000
  side_a:
    ip: 10.0.0.1/30
    peer_ip: 10.0.0.2
  side_b:
    ip: 10.0.0.2/30
    peer_ip: 10.0.0.1
  vlan:
    id: 4094
    name: mlagpeer
    trunk_group_name: mlagpeer
Notice we now have a few more variables, namely the mlag dictionary. We also can see that the banner_text has changed yet again. This time due to the fact that this variable is defined in
~/project/labfiles/ci-workshops-fundamentals/ansible/inventory/host_vars/s1-leaf1.yml. This demonstrates that a variable defined in host_vars will take priority over the same variable defined in group_vars.
s1-leaf1.yml (~/project/labfiles/ci-workshops-fundamentals/ansible/inventory/host_vars/s1-leaf1.yml)
Next, let's use a playbook to deploy our "Message of the Day" banner to all of the switches in our lab!
Playbooks
Ansible Playbooks are written in YAML and typically consist of four main components:
- Plays
- Tasks
- Modules
- Module Parameters
Other items such as variables, conditionals, tags, comments, and more are also available tools for us. But, we will focus on the four main components for our discussion.
To do this, we'll review a playbook together. Specifically, the ~/project/labfiles/ci-workshops-fundamentals/ansible/playbooks/deploy_banner.yml in our lab environment.
At the start of our playbook, we have the Play which is the very root of the playbook. At the beginning of the play is where we define the Managed Nodes we'd like to target with this play, as well as the list of tasks we'd like to run on these target hosts.
Next, we have the task itself, leveraging the eos_facts module to gather information about the Managed Nodes (devices running Arista's EOS in our topology). In a minute, we'll unpack what a module is behind the scenes.
Finally, we have any parameters associated with a module. Some of these parameters may be required, while others may be optional. The best way to learn about a module is to find its documentation out on Ansible Galaxy by searching for it. For example, when we search for eos_ on Ansible Galaxy, we get the output below:
34 Modules, one of which is the eos_banner module, with all its associated documentation!
More on Ansible Galaxy in a bit...
Configure Your Lab Password
Update WORKSHOP_FABRIC.yml at the line ansible_ssh_pass with your specific lab password otherwise Ansible playbook runs will error out. (~/project/labfiles/ci-workshops-fundamentals/ansible/inventory/group_vars/WORKSHOP_FABRIC.yml)
Let's go ahead and run our playbook! Bonus points if cowsay is enabled.
Alright! Let's hop into our switches and see what happened...
s2-spine1
s1-spine1
s1-leaf1
As expected, each device used whichever banner_text variable was closest to it in the group hierarchy. Or in the case of s1-leaf1, banner_text was applied via its host_vars file.
Modules
When we ran our playbook, one of the key components was the module. In our case, this was the eos_banner module.
But what is this module doing behind the scenes? Why are modules such a key piece of what makes Ansible much easier to start with than other Automation Frameworks?
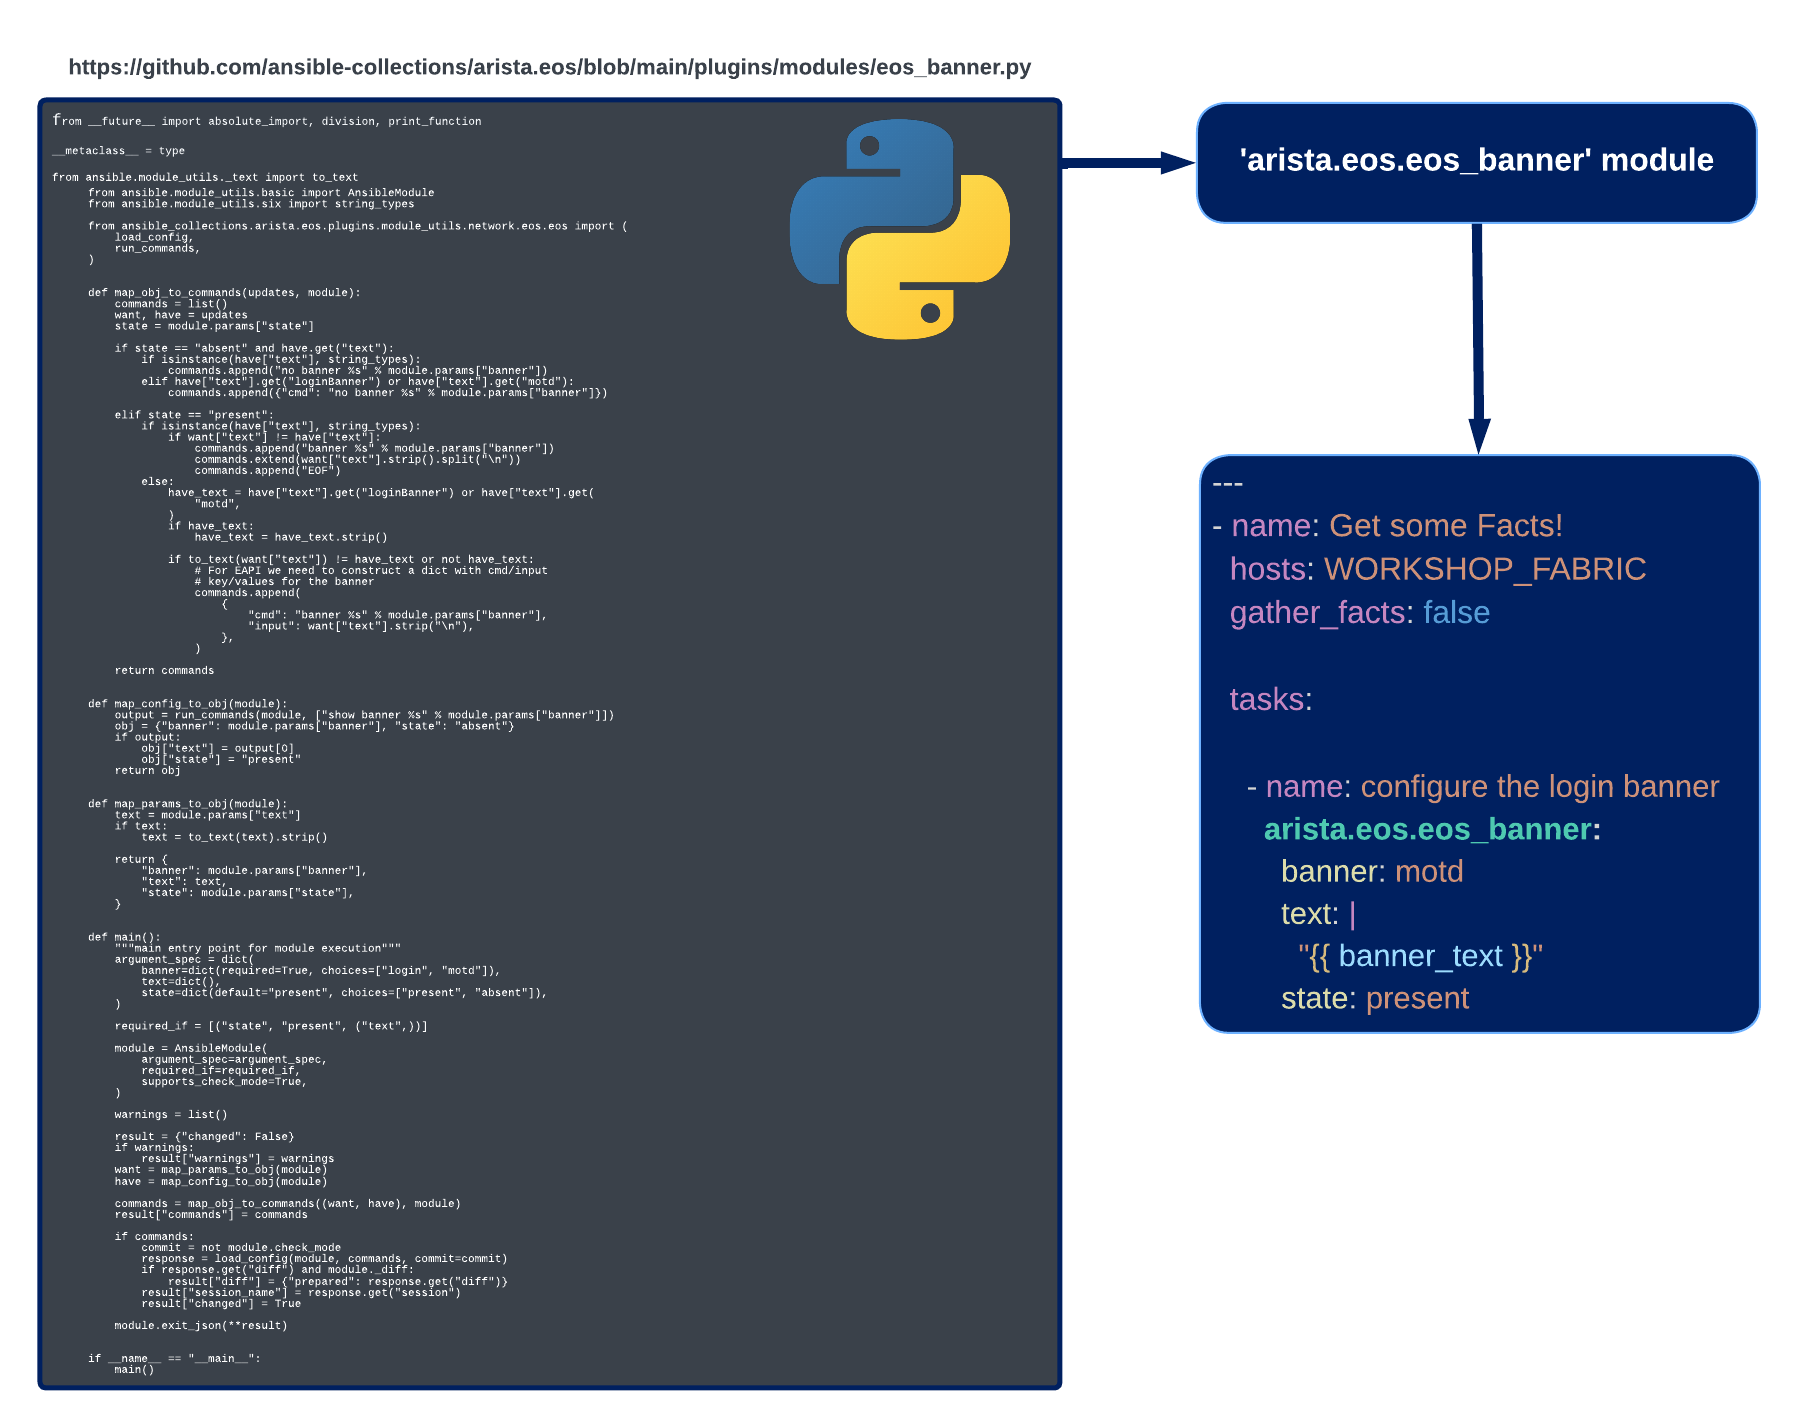
Modules are an abstraction of the Python code necessary to complete a given task, or tasks, associated with the module. In other words, behind the scenes, modules are just Python code!
An example of this can be seen below, specifically for the eos_banner module:
It's a lot easier to call eos_banner in a playbook than it is to write, in a reusable fashion, all of that Python code! The abstraction of the detailed "behind the scenes" code is why modules are such as big reason Ansible is easy to get started with.
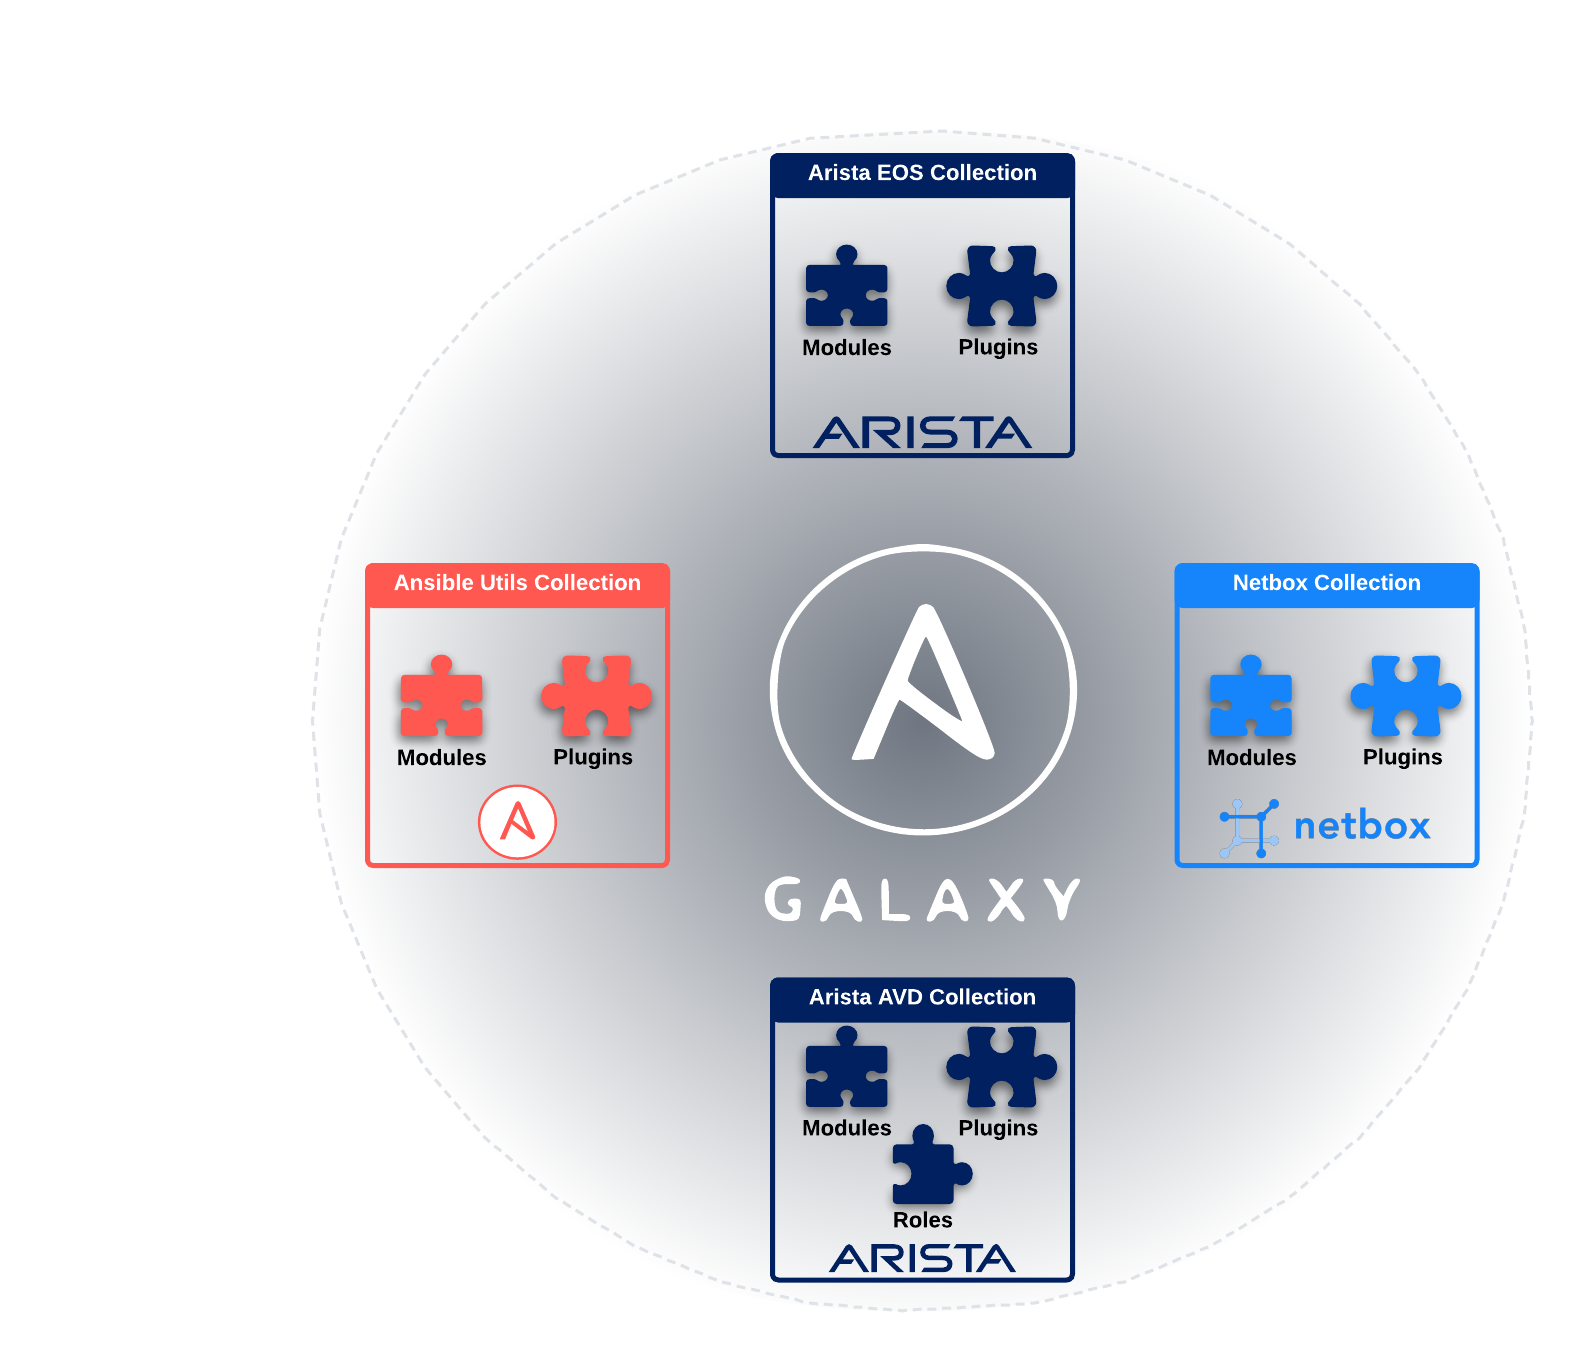
Now, if we feel compelled to dive in and write our own modules, or our own roles/collections/plugins, we can certainly do this. Ansible is very extensible in this manner. When we're finished developing our content, if we want to share it with the world, then we can publish it as a Collection on Ansible Galaxy!.
Ansible Galaxy
Earlier, we specified that we were using ansible-core for this workshop. This approach, instead of installing ansible, is becoming increasingly preferred. The reason for this is the efficiency of ansible-core; it is a lightweight minimalist installation of Ansible without any extra modules, roles, plugins, etc., natively included.
With ansible-core, we can only grab the modules, roles, plugins, etc. that we need from Ansible Galaxy!.
For example, if we want to install the Arista EOS Ansible Collection, we can enter the following command in our terminal.
Once completed, we can validate that the collection has been installed by running the command below:
Info
The ansible-galaxy collection list command is supported in Ansible 2.10+
This will yield output similar to below:
Ansible Galaxy Collection List
Note the line in the output /home/coder/.ansible/collections/ansible_collections...how did Ansible know to look here? The answer: The ansible.cfg file!
Specifically, this parameter:
# Path(s) to search for installed Ansible Galaxy Collections
collections_paths = ~/.ansible/collections
Galaxy has thousands of modules, plugins, roles, and more from many community members.
For those familiar with Python, we can think of Ansible Galaxy as PyPi, and our Collections as Python modules.
Go forth and explore!
Ansible Roles
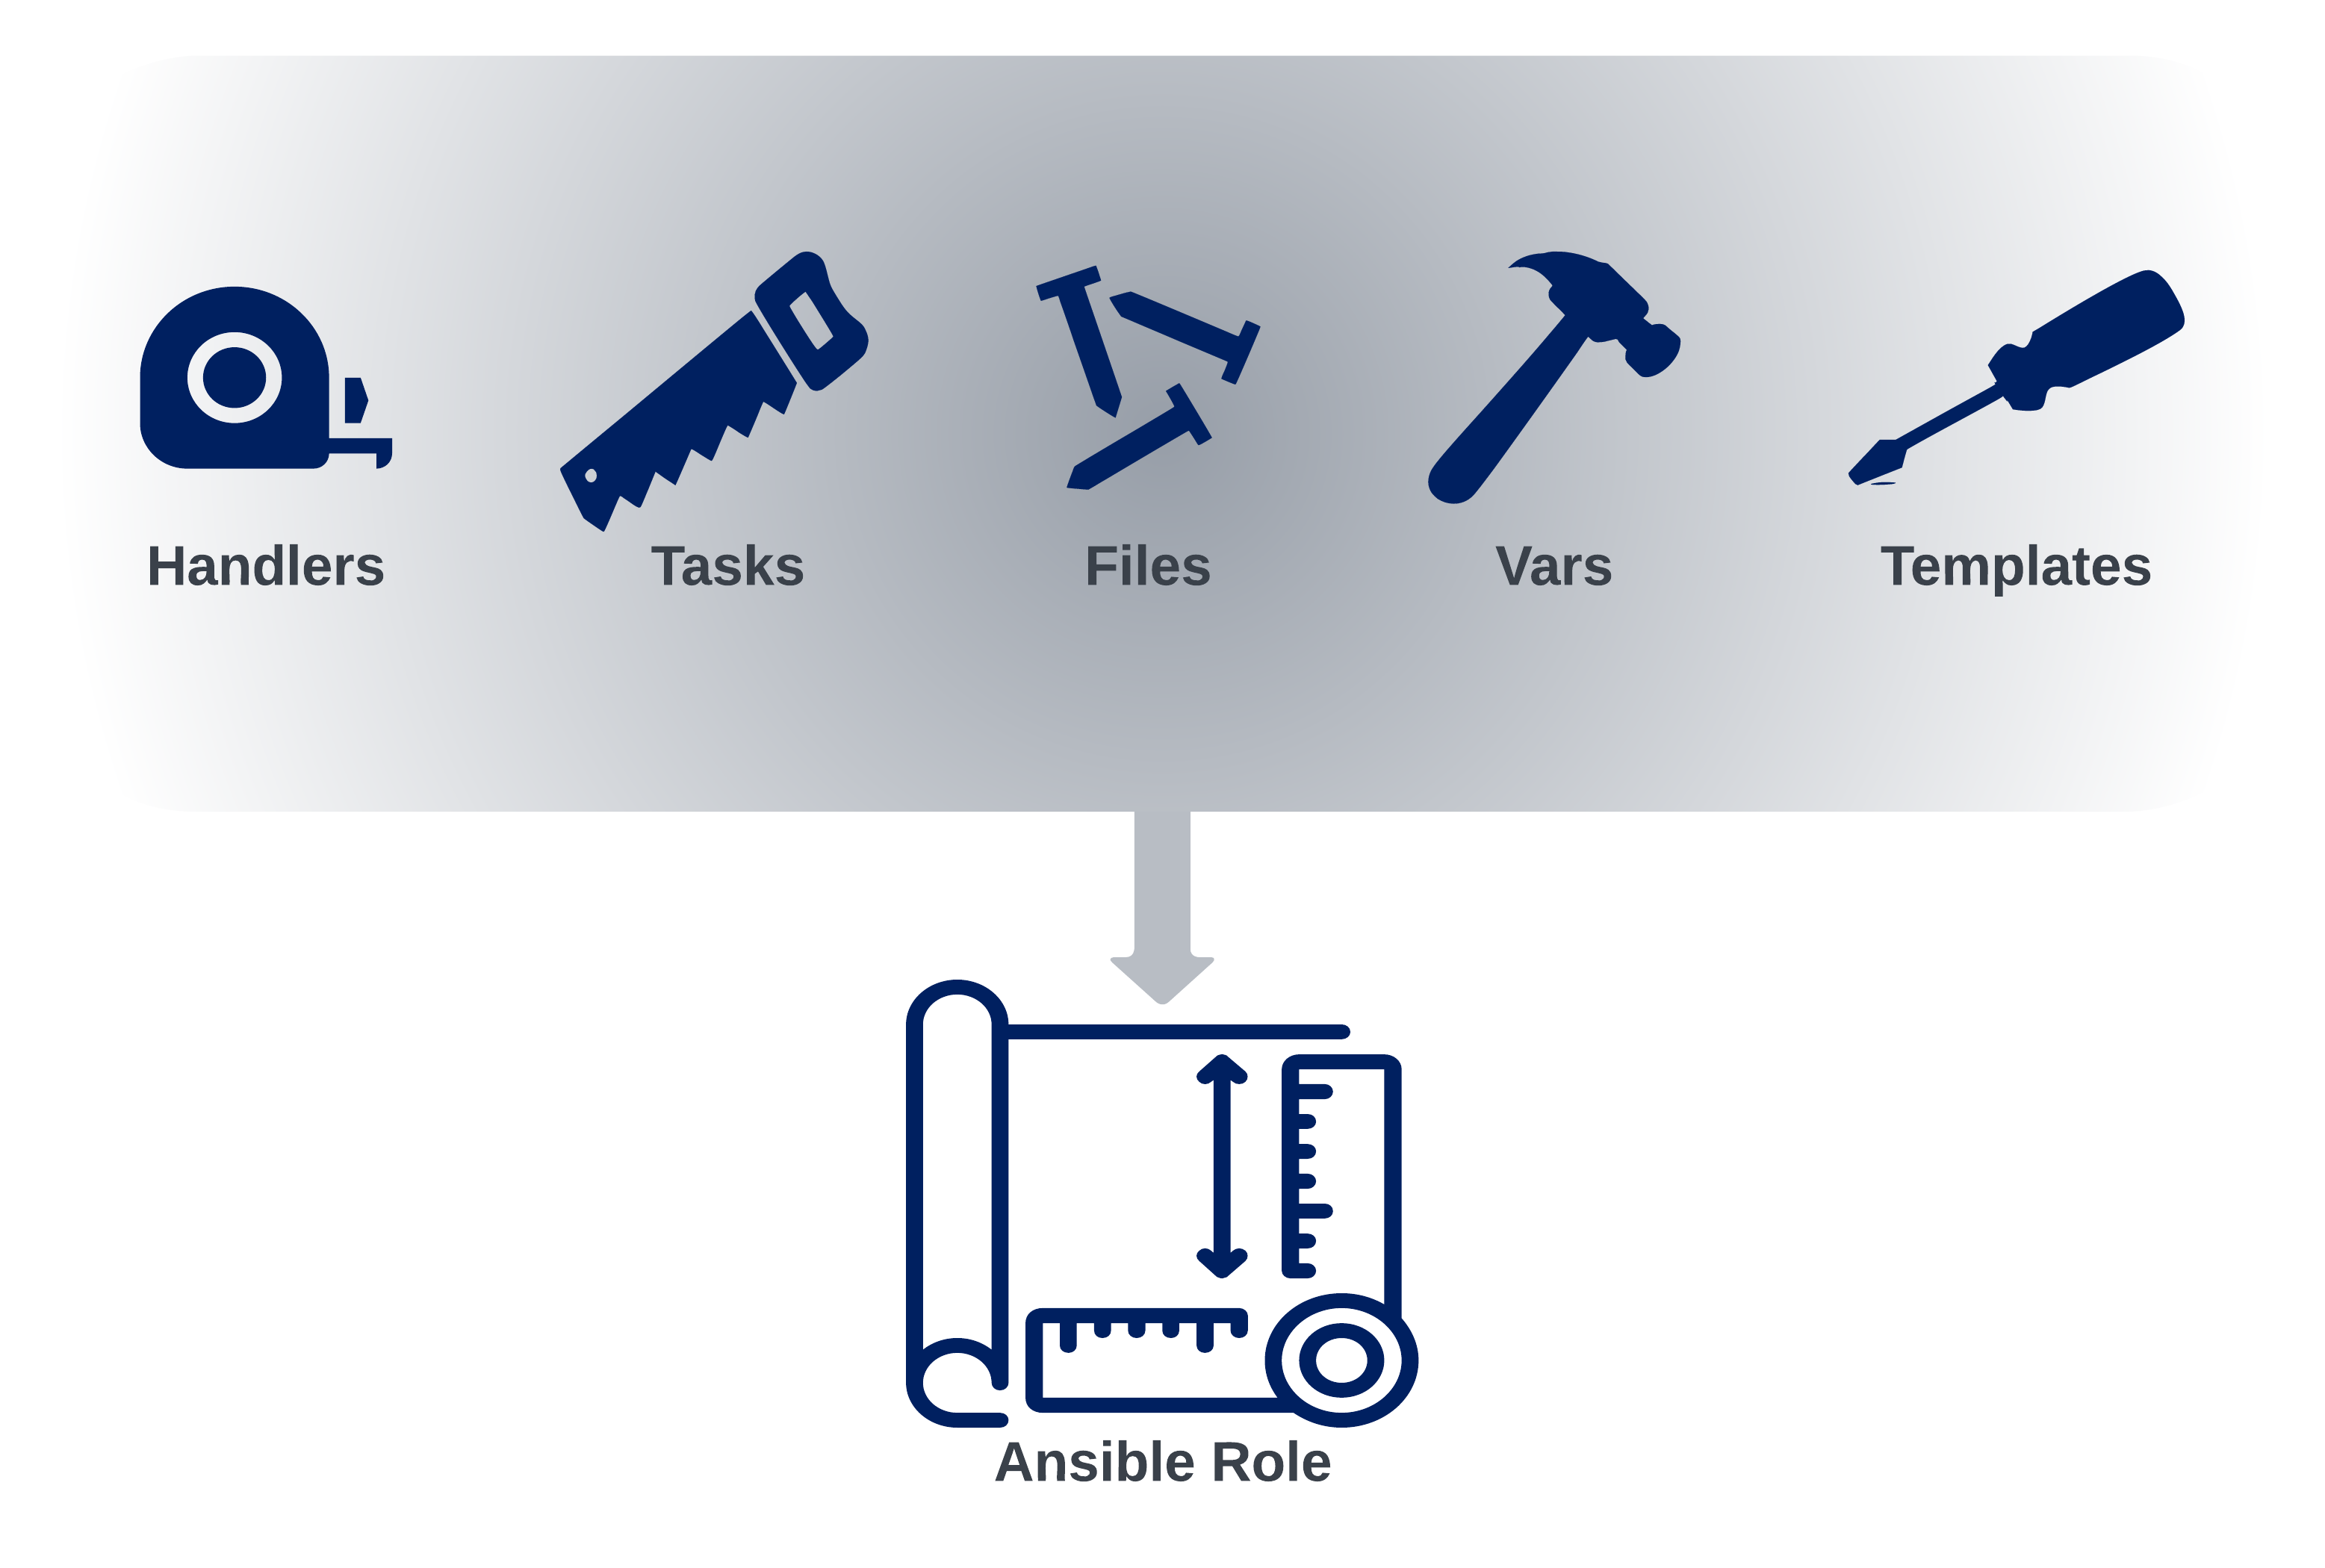
Ansible roles allow us to neatly pack all of the tasks, templates, files, etc., that we use to accomplish a task into a nice reusable format. An example of this could be a standardized method for installing NGINX or Apache on a server. Or, as we'll see in our labs, deploying an MLAG domain configuration on Arista switches.
Ultimately, Ansible Roles can be seen as a blueprint to automate and standardize our repeatable tasks.
